[Updated] Creating a Free Blog on OCI
![[Updated] Creating a Free Blog on OCI](/content/images/size/w2000/2022/03/maincover-1.png)
In this updated article we'll walkthrough the steps to create a free blog hosted on Oracle Cloud Infrastructure, utilising Oracle's very generous Ampere A1 instance which gives you 4 OCPUs (8 Threads) & 24GB RAM for FREE. We'll be also be using the Always Free Network Load Balancer & Bastion Service. We'll first have a very short introduction into the various components involved in this setup, then look at the process and start getting to work! Feel free to skip the theory and jump to whatever section you're interested in.
Components:
Components Involved:
- OCI - Network Load Balancer
- OCI - A1 Ampere Compute Instance
- OCI - Bastion Service
- OCI - Other Core Networking (VCN, Subnet, Internet & NAT Gateway etc)
- Ghost
- Lets Encrypt
- NoIP
Explanation of some Components Involved:
Oracle Cloud Infrastructure
Oracle Cloud Free Tier offers Always Free services, which includes a Compute VM which we'll use to host our free website
OCI - Network Load Balancer
Network Load Balancer provides the benefits of flow high availability, source and destination IP addresses, and port preservation. It is designed to handle volatile traffic patterns and millions of flows, offering high throughput while maintaining ultra low latency. Network load balancers have a default 1 million concurrent connection limit. Network Load Balancer is the ideal load balancing solution for latency sensitive workloads.
Ghost
Ghost is a free, opensource and simple web application from which you can create and manage your blog and contents. It has the combined advantage of automatically configuring nginx as a reverse proxy and for HTTPS, as well as obtaining the SSL Certificate and making a crontab entry to automatically renew these certificates.
Let's Encrypt
Let's Encrypt is a free, opensource and automated Certificate Authority. Let's Encrypt offer FREE SSL/TLS Certificates! They are only valid for 90 days, but can simply be renewed.
NoIP
NoIP offer free hostnames under select few domains, they also provide you with complete control over the DNS records for that hostname, so we can the website address directly to our Free OCI VM
Process & Architecture
Process

The process itself is quite straight forward. First we'll setup the underlying infrastructure in OCI to support the provisioning of our Free VM. We'll then Create and Configure the domain and DNS and point it to our OCI VM (This must be done before configuring Ghost in order to obtain and configure SSL Certs). We'll then finish up by installing Ghost!
Architecture
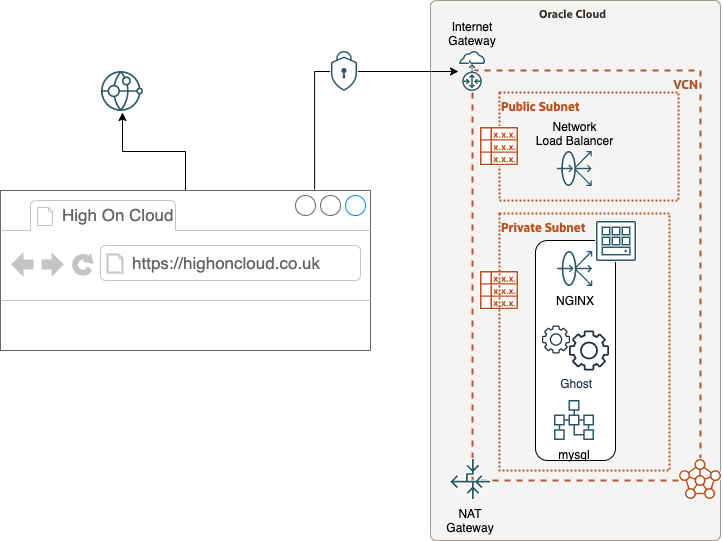
The architecture is quite straight forward. We have a Public Subnet and a Private Subnet. The Network Load Balancer, which resides in the Public Subnet and has a Public IP, will receive HTTPS traffic from Public Internet and will direct it to the Private Compute instance, inside the Private Subnet, hosting our blogging software.
The Compute Instance in a Private Subnet is not directly accessible via Public Internet, for security reasons. The Compute Instance can however talk out to the internet via NAT Gateway in order to obtain required software and updates. We'll utilise the free Bastion Service to access the private Compute Instance to perform our admin tasks.
Tutorial
If you don't already have an OCI tenancy then go and grab your Always Free account...
Create Networking
To speed things a long we'll use the Network Wizard; which we can select from the Launch resources window in Get Started tab in the Home Screen
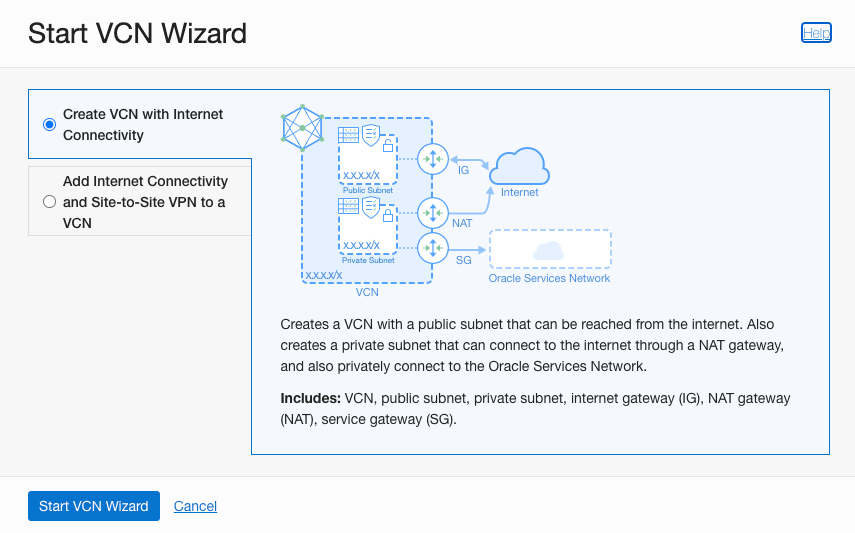
- Ensure "Create VCN with Internet Connectivity" is selected
- Click "Start VCN Wizard"
Fill in all of the information pertaining to our VCN setup
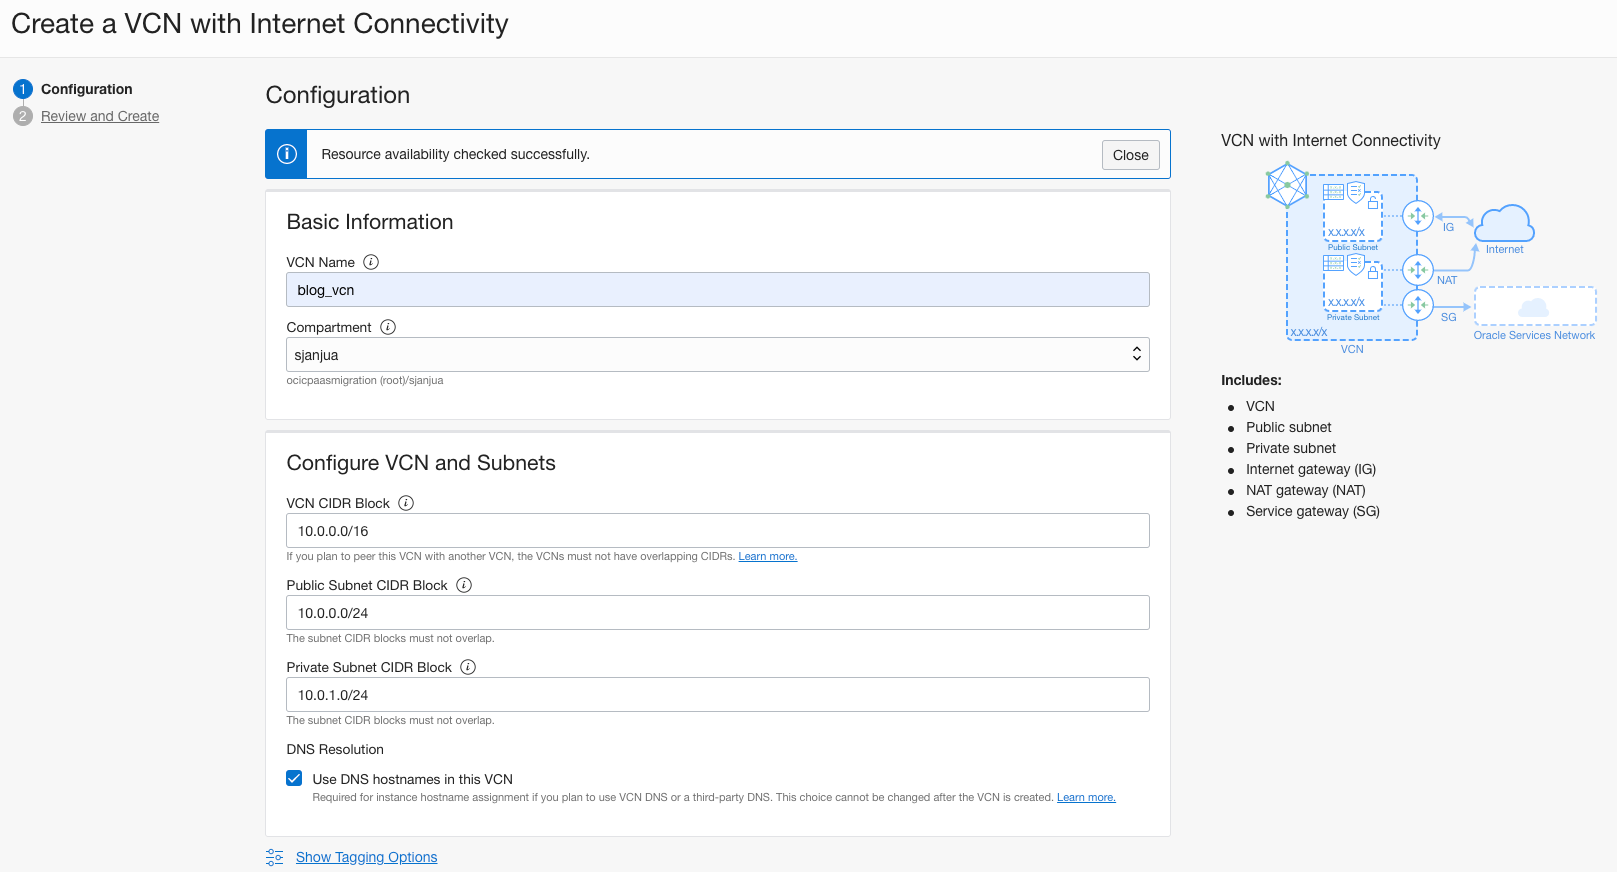
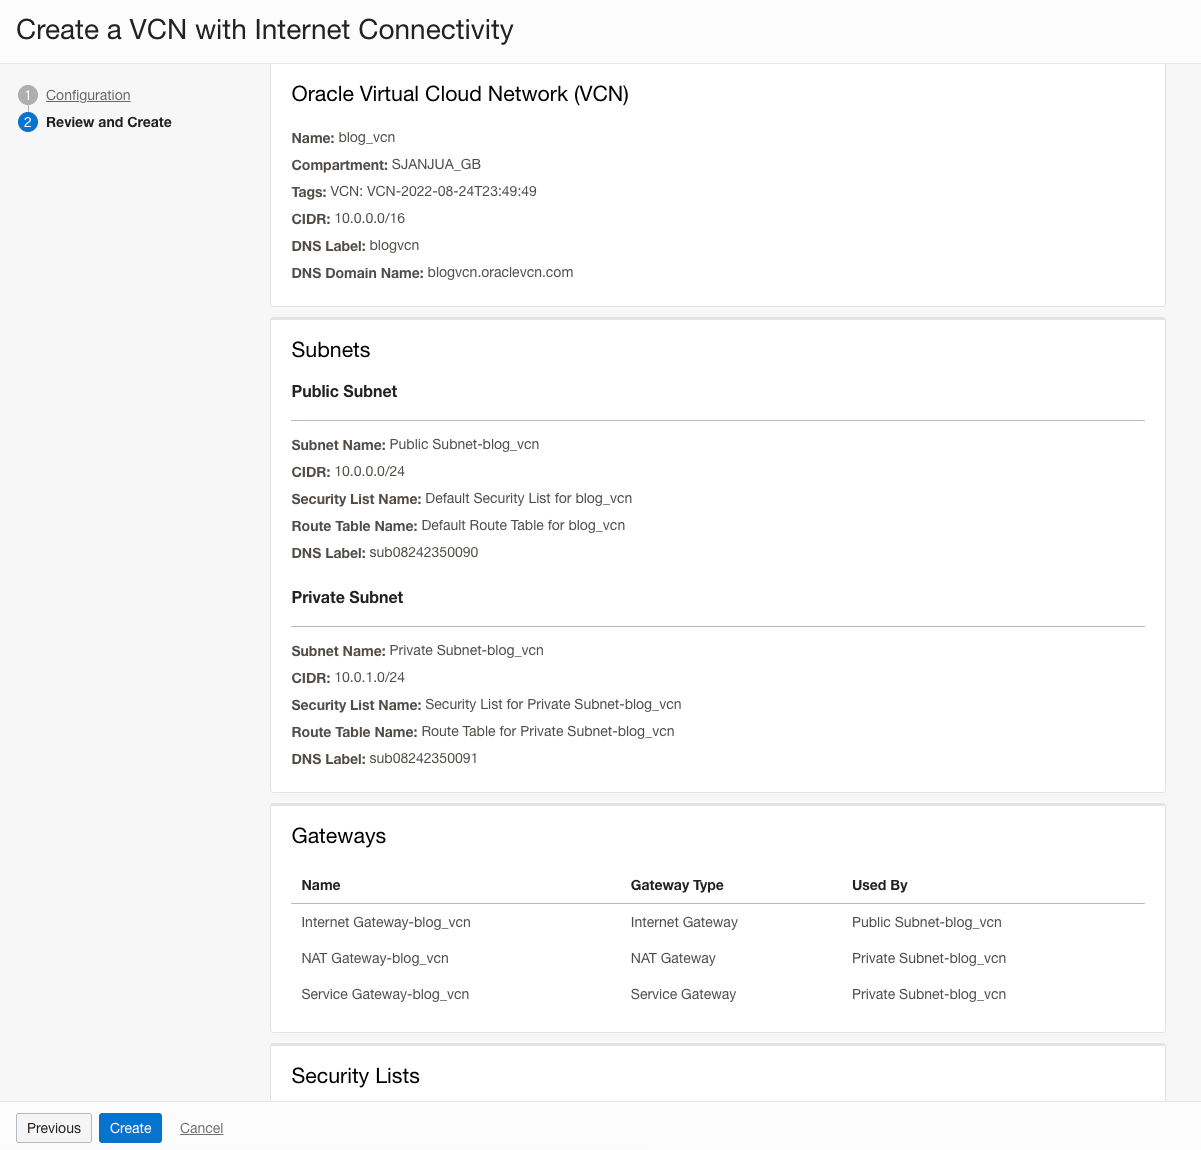
Review the Networking Information, Click "Create"
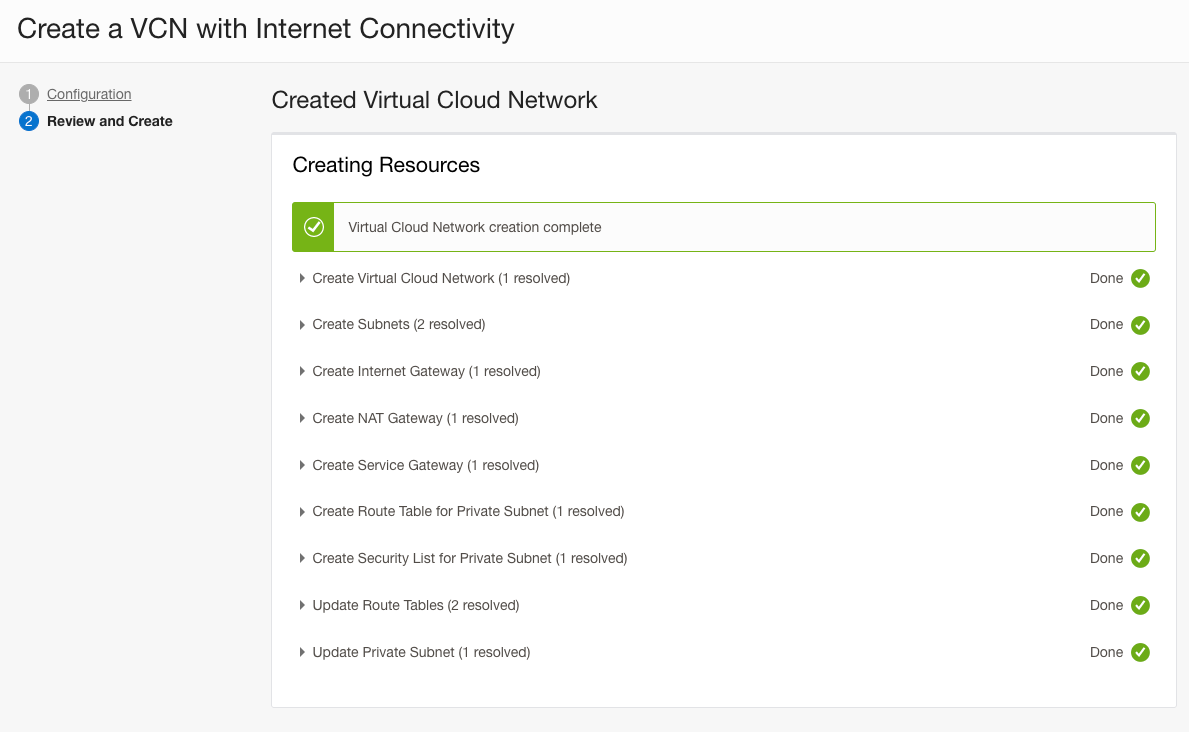
Networking Resources will be provisioned and can be viewed once Provisioning is completed
Update Security Rules
When viewing the VCN, navigate through the following;
- Click "Security Lists" under "Resources"
- Click on the private subnet security list
- Select first line (with TCP Protocol & Destination Port 22)
- Click Edit
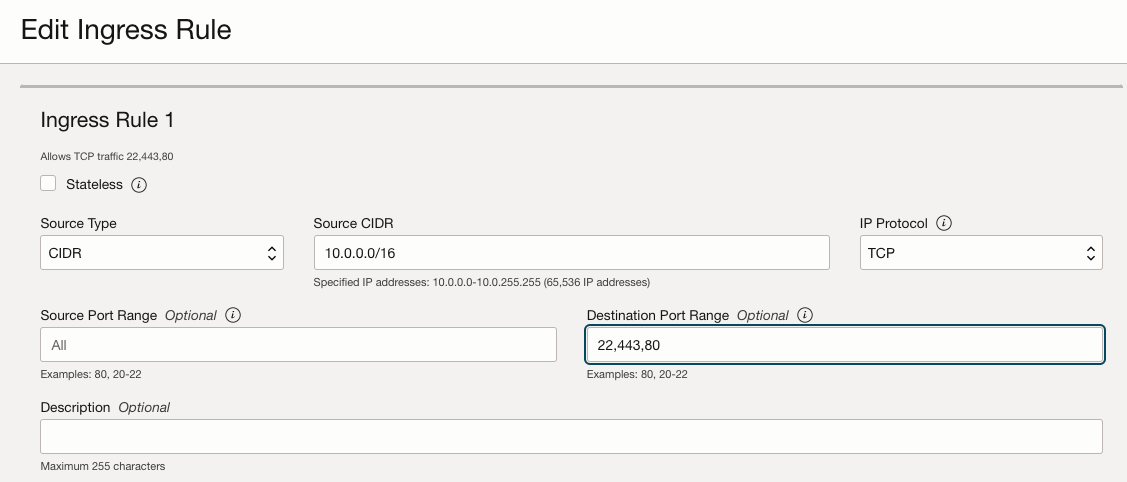
- Append Destination Port Range with ",443,80"
- Click Save changes
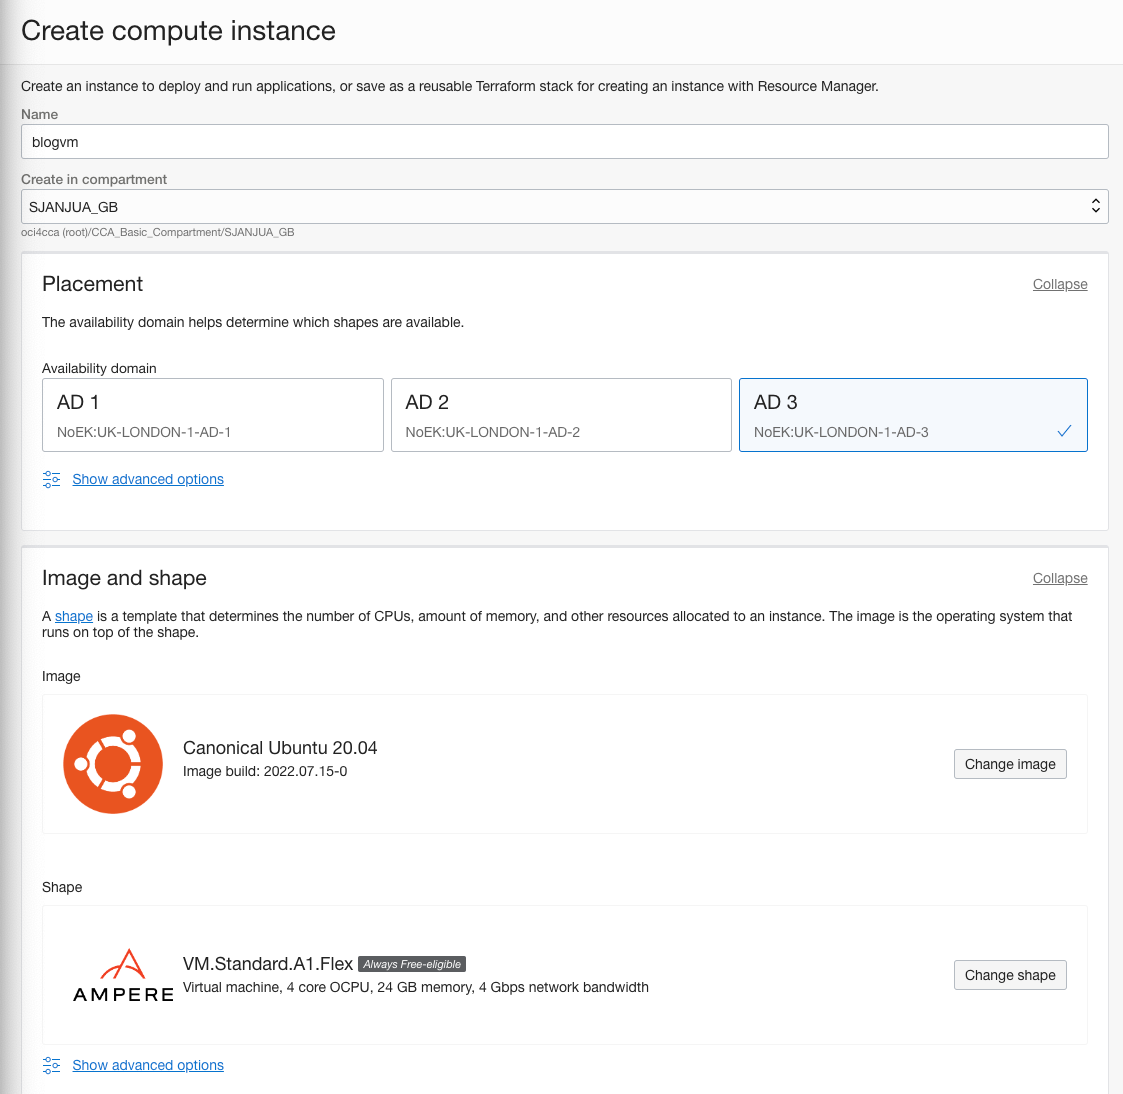
Create Compute Instance
Select Create VM from the Launch resources window in Get Started tab in the Home Screen, then fill out the VM configuration information;
- Change the image to Canonical Ubuntu 20.04
- Change the shape VM.Standard.A1.Flex with 4 OCPUs & 24 GB memory
- Ensure you select the private subnet for the Subnet of the Primary VNIC
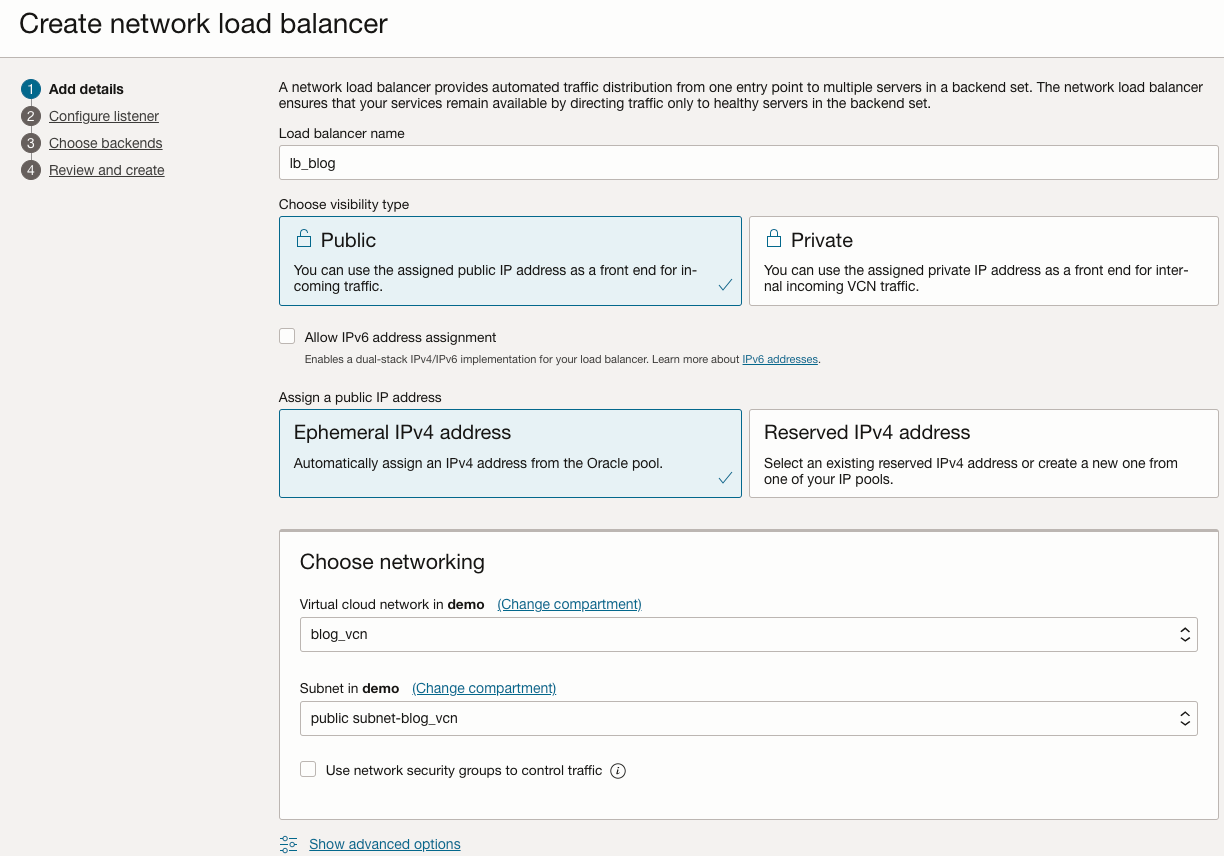
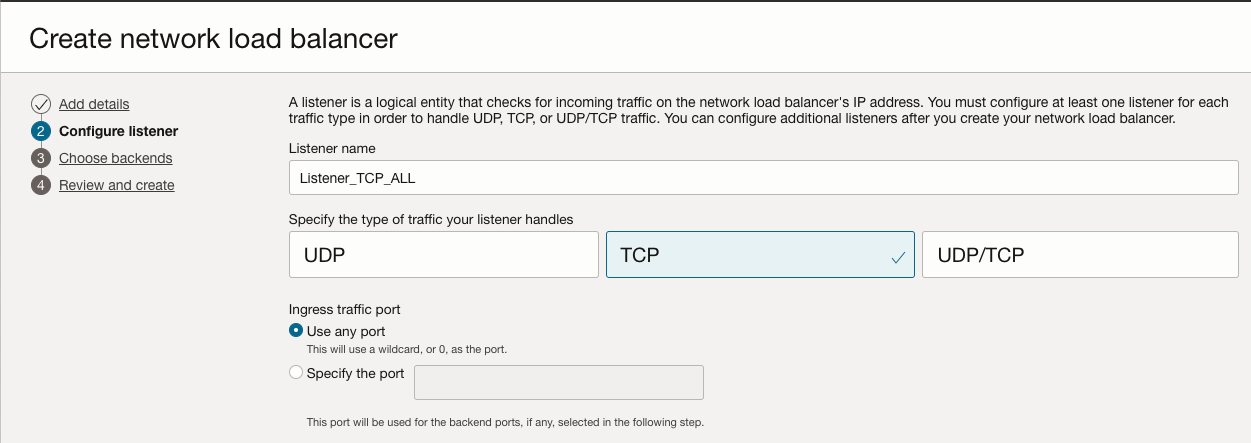
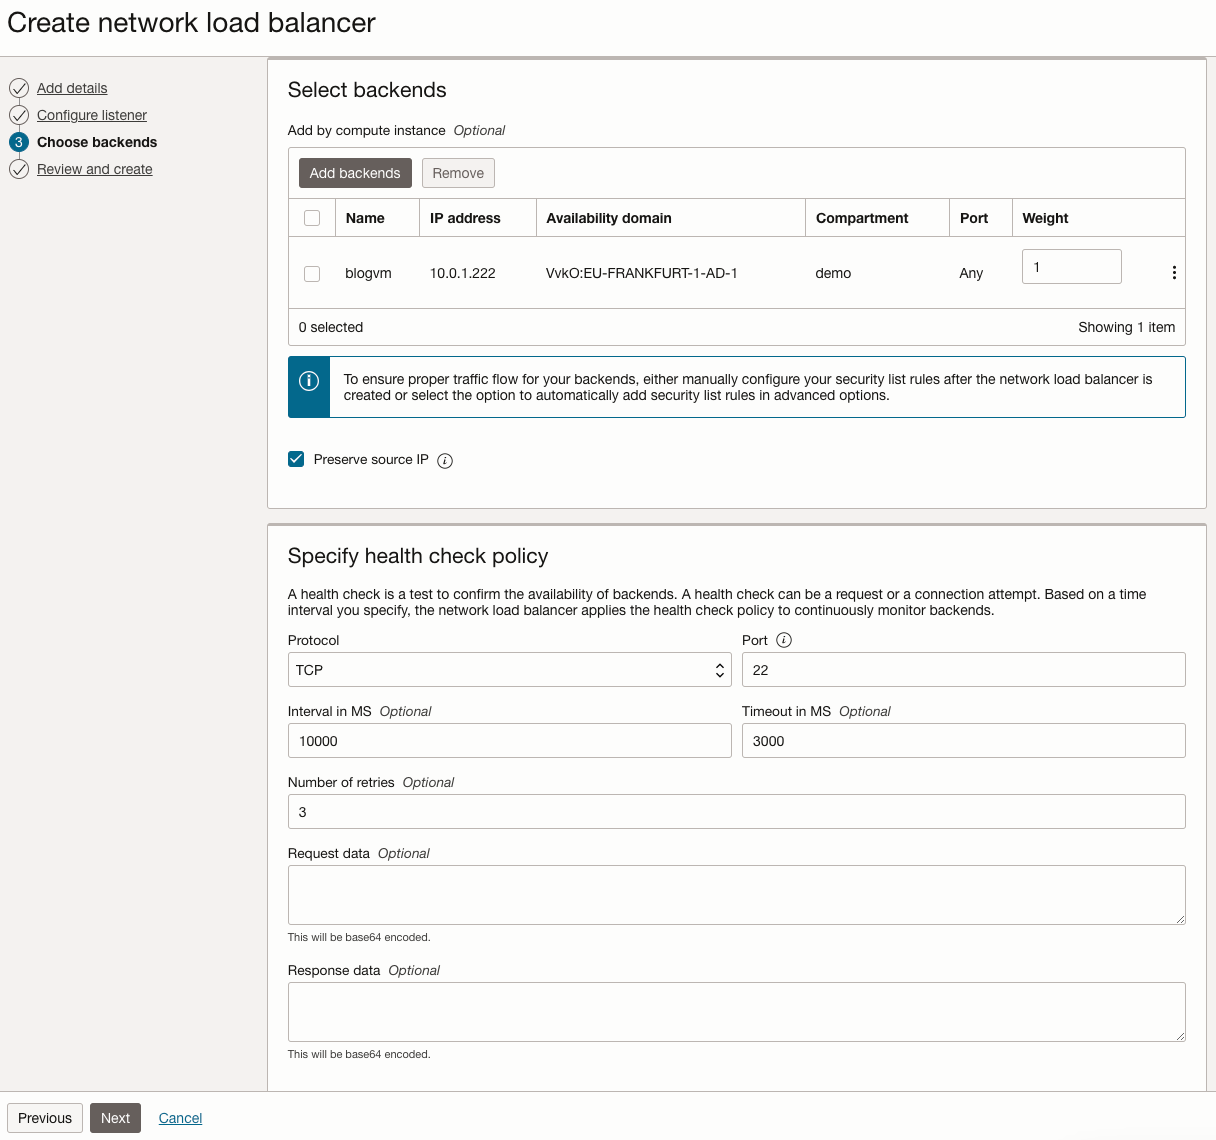
Create Network Load Balancer
Select "Set up a load balancer" from the Launch resources window in Get Started tab in the Home Screen
Click "Create network load balancer" populate the require information
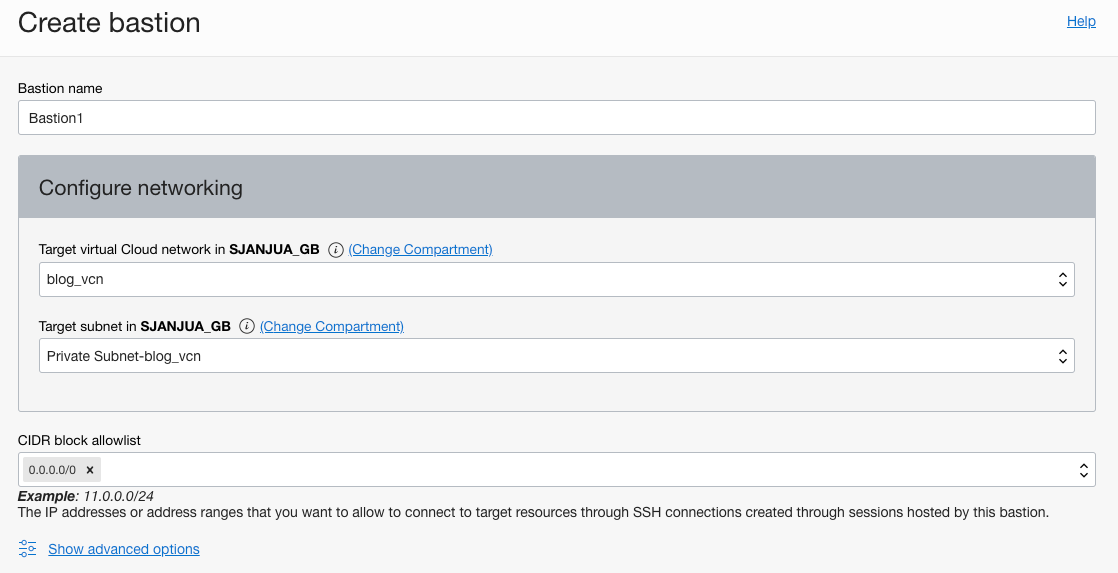
Create Bastion
Click on the Hamburger symbol on the top left of the console.
Under "Identity & Security", click "Bastion" and then "Create Bastion"
Provide a name and select the VCN and private Subnet, allow 0.0.0.0/0 or your computers public IP/32 in the CIDR allowlist
Once the Bastion service is created, click on the service and click "Create session"
provide a username, select the compute instance we created and upload an SSH key
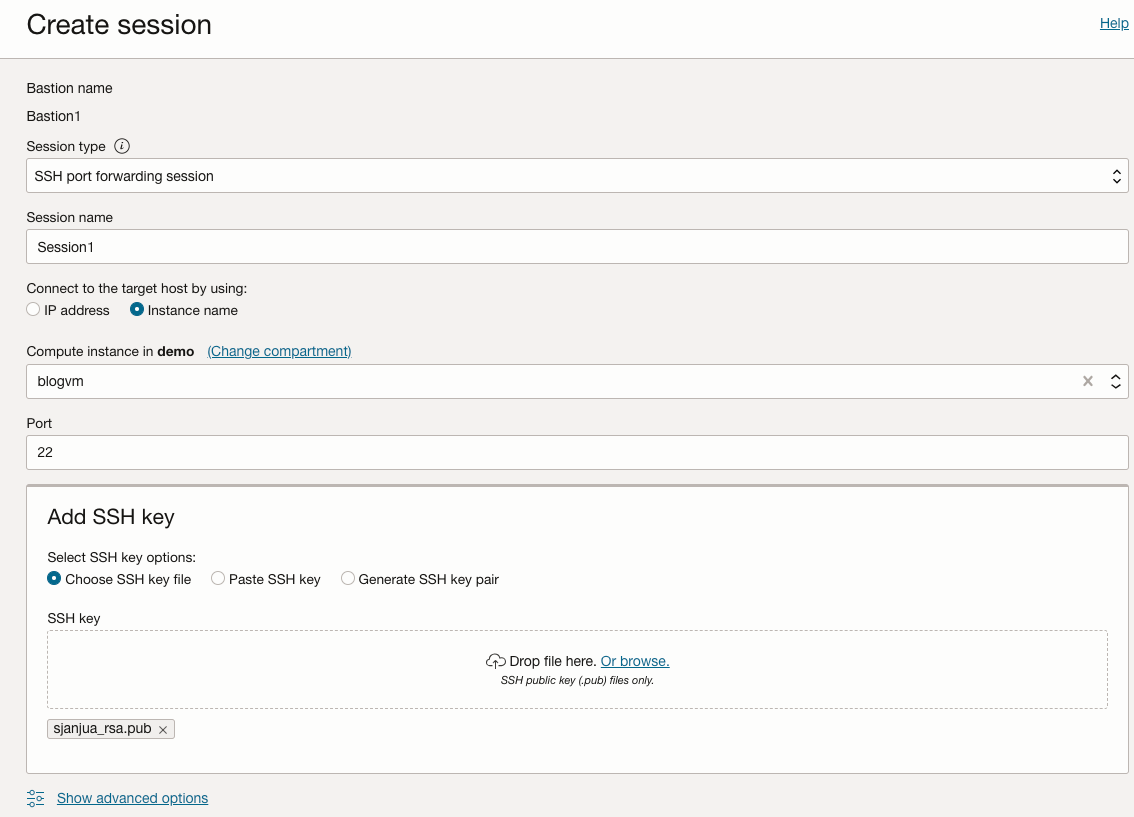
Once the session is created, copy the SSH command

Save this command
ssh -i <privateKey> -N -L <localPort>:10.0.1.222:22 -p 22 ocid1.bastionsession.oc1.eu-frankfurt-1.amaaaaaaztrrnmqaba365sr2ckqrmedj3gxuazdlprxexfxvtacjhej2dxda@host.bastion.eu-frankfurt-1.oci.oraclecloud.comCreate & Configure Domain
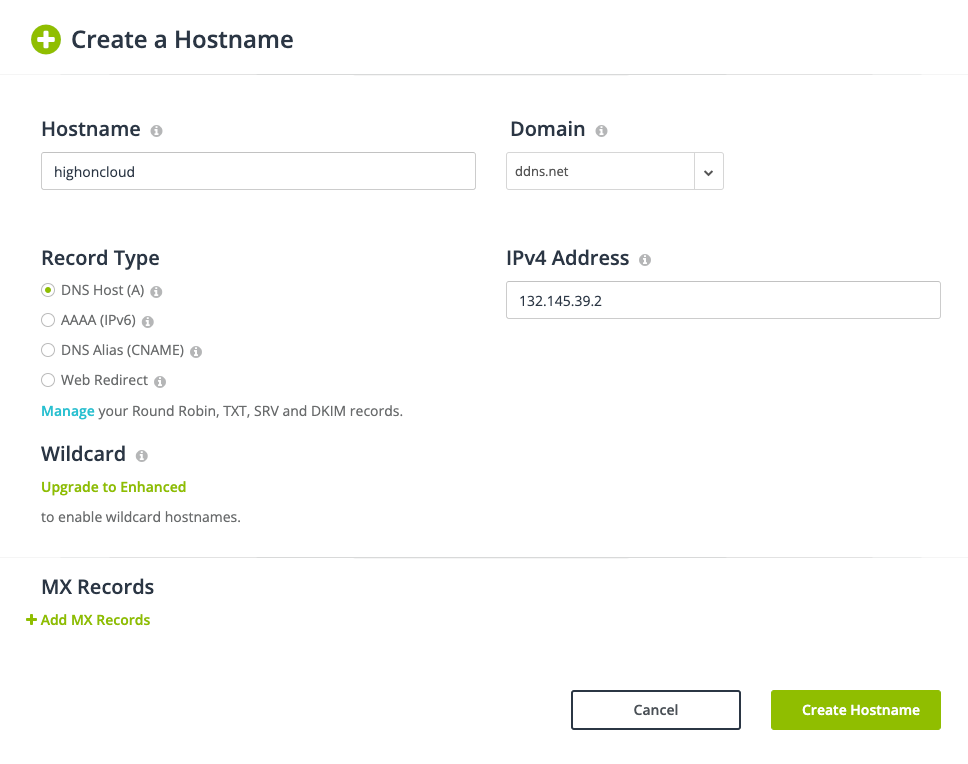
 Head over to https://www.noip.com/ and grab your free domain
Create an A record for your domain
Install Ghost
Connect to VM
Let's look at the SSH command we copied
ssh -i <privateKey> -N -L <localPort>:10.0.1.222:22 -p 22 ocid1.bastionsession.oc1.eu-frankfurt-1.amaaaaaaztrrnmqaba365sr2ckqrmedj3gxuazdlprxexfxvtacjhej2dxda@host.bastion.eu-frankfurt-1.oci.oraclecloud.comAll we need to do to setup an SSH tunnel is give it the private key location and a local port. Execute this command
ssh -i sjanjua_rsa.ppk -N -L 9500:10.0.1.222:22 -p 22 ocid1.bastionsession.oc1.eu-frankfurt-1.amaaaaaaztrrnmqaba365sr2ckqrmedj3gxuazdlprxexfxvtacjhej2dxda@host.bastion.eu-frankfurt-1.oci.oraclecloud.comYou can then SSH into them
ssh ubuntu@localhost -p 9500Ghost Setup
Now let's start with the Ghost setup installation.
sudo apt upgrade
sudo apt update
Perform an update of the packages
sudo iptables -I INPUT 5 -p tcp --dport 80 -j ACCEPT
sudo iptables -I INPUT 5 -p tcp --dport 443 -j ACCEPT
sudo iptables-save | sudo tee /etc/iptables/rules.v4
Open up the OS Firewall for ports 80 and 443
sudo adduser ghostusr
sudo usermod -aG sudo ghostusr
sudo su - ghostusr
Create a user for Ghost install, allow the user access to sudo
sudo apt install cron
sudo apt-get install nginx
sudo apt-get install mysql-server
sudo apt-get install build-essential
Install cron, nginx and mysql-server. We'll also install build-essential to avoid an error during ghost install
sudo mysqlLogin to mysql
alter user 'root'@'localhost' identified with mysql_native_password by 'oracle99';
quit;
Set the root user password
curl -sL https://deb.nodesource.com/setup_18.x | sudo -E bash
sudo apt-get install -y nodejs
Install nodejs
sudo npm install ghost-cli@latest -gInstall Ghost CLI
sudo mkdir -p /var/www/ghost
sudo chown ghostusr:ghostusr /var/www/ghost
sudo chmod 775 /var/www/ghost
cd /var/www/ghost
Create a directory to host the Ghost Instance
Run the Ghost installation. You'll need to provide the URL, mysql details and an email address.
Answer Yes to all responses
ghost install
✔ Checking system Node.js version - found v14.20.0
✔ Checking logged in user
✔ Checking current folder permissions
✔ Checking system compatibility
✔ Checking for a MySQL installation
✔ Checking memory availability
✔ Checking free space
✔ Checking for latest Ghost version
✔ Setting up install directory
✔ Downloading and installing Ghost v5.12.0
✔ Finishing install process
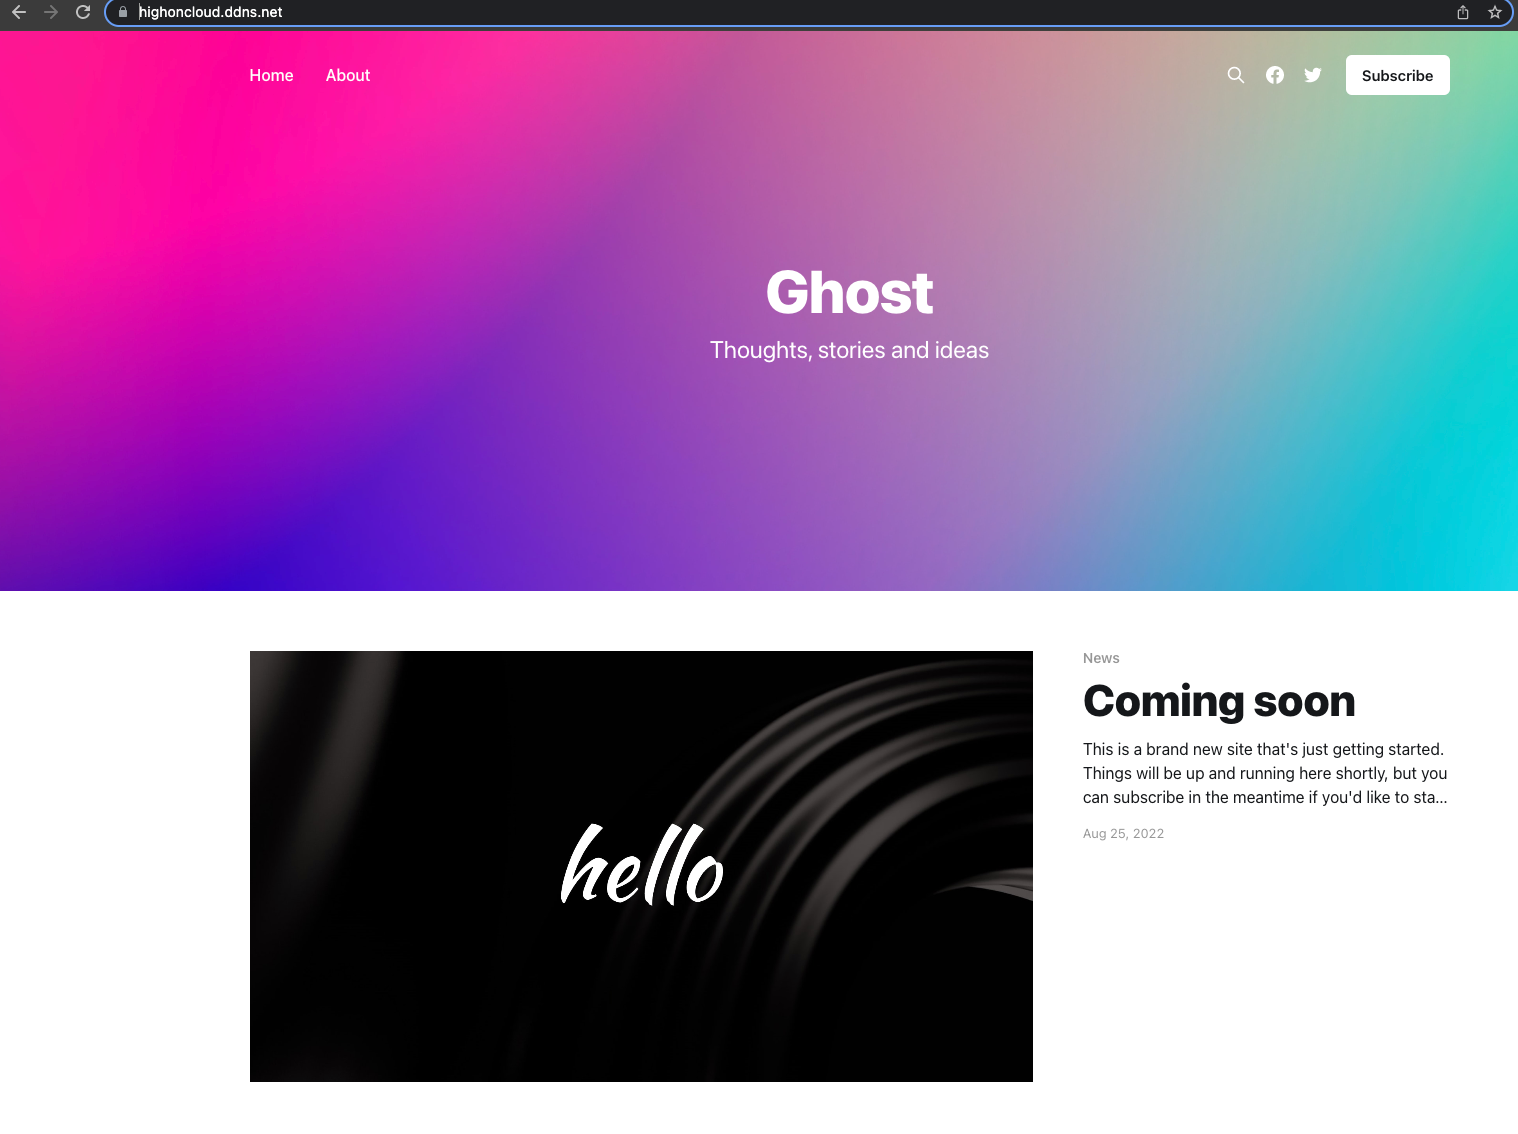
? Enter your blog URL: https://highoncloud.ddns.net
? Enter your MySQL hostname: localhost
? Enter your MySQL username: root
? Enter your MySQL password: [hidden]
? Enter your Ghost database name: ghostdb
✔ Configuring Ghost
✔ Setting up instance
+ sudo chown -R ghost:ghost /var/www/ghost/content
✔ Setting up "ghost" system user
? Do you wish to set up "ghost" mysql user? Yes
✔ Setting up "ghost" mysql user
? Do you wish to set up Nginx? Yes
+ sudo mv /tmp/highoncloud-ddns-net/highoncloud.ddns.net.conf /etc/nginx/sites-available/highoncloud.ddns.net.conf
+ sudo ln -sf /etc/nginx/sites-available/highoncloud.ddns.net.conf /etc/nginx/sites-enabled/highoncloud.ddns.net.conf
+ sudo nginx -s reload
✔ Setting up Nginx
? Do you wish to set up SSL? Yes
? Enter your email (For SSL Certificate) sjspm1@gmail.com
+ sudo /etc/letsencrypt/acme.sh --upgrade --home /etc/letsencrypt
+ sudo /etc/letsencrypt/acme.sh --issue --home /etc/letsencrypt --server letsencrypt --domain highoncloud.ddns.net --webroot /var/www/ghost/system/nginx-root --reloadcmd "nginx -s reload" --accountemail sjspm1@gmail.com
+ sudo openssl dhparam -dsaparam -out /etc/nginx/snippets/dhparam.pem 2048
+ sudo mv /tmp/ssl-params.conf /etc/nginx/snippets/ssl-params.conf
+ sudo mv /tmp/highoncloud-ddns-net/highoncloud.ddns.net-ssl.conf /etc/nginx/sites-available/highoncloud.ddns.net-ssl.conf
+ sudo ln -sf /etc/nginx/sites-available/highoncloud.ddns.net-ssl.conf /etc/nginx/sites-enabled/highoncloud.ddns.net-ssl.conf
+ sudo nginx -s reload
✔ Setting up SSL
? Do you wish to set up Systemd? Yes
+ sudo mv /tmp/highoncloud-ddns-net/ghost_highoncloud-ddns-net.service /lib/systemd/system/ghost_highoncloud-ddns-net.service
+ sudo systemctl daemon-reload
✔ Setting up Systemd
+ sudo systemctl is-active ghost_highoncloud-ddns-net
? Do you want to start Ghost? Yes
+ sudo systemctl start ghost_highoncloud-ddns-net
+ sudo systemctl is-enabled ghost_highoncloud-ddns-net
+ sudo systemctl enable ghost_highoncloud-ddns-net --quiet
✔ Starting Ghost
Ghost uses direct mail by default. To set up an alternative email method read our docs at https://ghost.org/docs/config/#mail
------------------------------------------------------------------------------
Ghost was installed successfully! To complete setup of your publication, visit:
https://highoncloud.ddns.net/ghost/Checkout your new site!