OCI LoadBalancer - Free SSL & Autorenewal (Let's Encrypt & Certbot)
In this article we'll look at setting up SSL Certificates for free on OCI LoadBalancer (LB), as well as automatically renewing the certificates in the LB when they expire. We'll use Terraform to do all of our Infrastructure setup, so we can focus on the Certificates & Automation!
Components
Oracle Cloud Infrastructure Load Balancer
The OCI Load Balancer provides Layer 7 Load Balancing and TLS Support, allowing us to use it for SSL termination, unlike the OCI Network Load Balancer (which does not provide either). This allows us to have a secure connection between End User and the Load Balancer, and then a HTTP call (stripping out SSL) between the Load Balancer and application, which is what we'll be setting up in this Tutorial. You can also do SSL Tunneling & End-2-End SSL.
Oracle Cloud Infrastructure Command Line Interface
The CLI is a small-footprint tool that you can use on its own or with the Console to complete Oracle Cloud Infrastructure tasks. The CLI provides the same core functionality as the Console, plus additional commands. Some of these, such as the ability to run scripts, extend Console functionality.
Let's Encrypt
Let's Encrypt is a free, opensource and automated Certificate Authority. Let's Encrypt offer FREE SSL/TLS Certificates! They are only valid for 90 days, but can simply be renewed.
Certbot
Certbot is a free, open source software tool for automatically using Let’s Encrypt certificates on manually-administrated websites to enable HTTPS.
Architecture

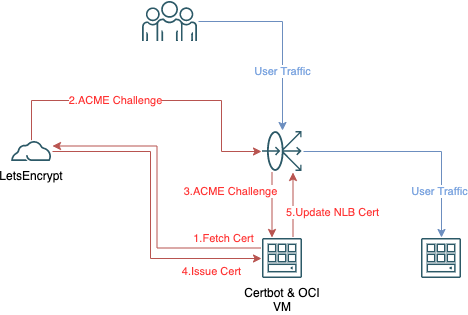
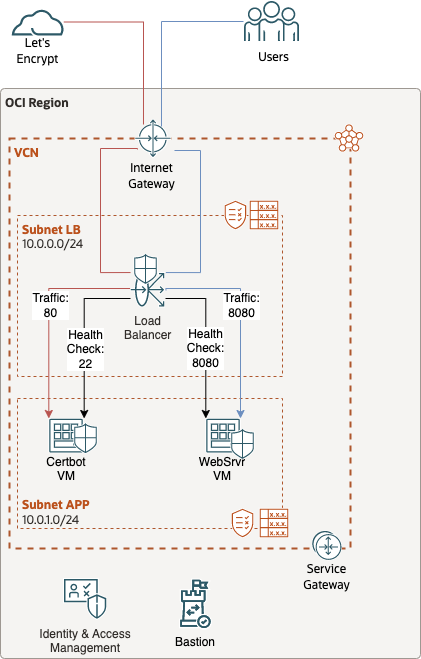
The architecture shown above is a simplified workflow of the SSL Certificate renewal & deployment. Everything in red pertains to the Certificate obtainment and deployment; Certbot VM is dedicated to this process. The LoadBalancer listens on 2 ports, each of which are connected to a different backend.
The first Listening Port is 443. This is the User TLS traffic that uses the Certificate. SSL Termination occurs on the LB, the traffic is then forwarded to a Compute instance, hosting a Webserver running on port 2839
The second Listening Port is 80. When traffic hits the LoadBalancer on Port 80, the LB forwards this traffic to Certbot VM on port 80, this is required for the Certificate creation
Let's Encrypt functions as an ACME Server and Certbot is an ACME client. In this setup ACME HTTP challenge is used, with this the ACME Server will attempt to access http://<DOMAIN>/.well-known/acme-challenge/<TOKEN> in order to prove ownership of the domain and create the Certificate. This means that the Certbot VM has to be accessible over port 80. Therefore our LB will be listening on port 80 and will direct the traffic to Certbot since the Compute instance is not accessible to Public Internet and has to be accessed via LB.
The high level flow is as follows;
- Certbot stands up Webserver running on port 80, for ACME Challenge
- Certbot fetches certificate from Let's Encrypt
- Let's Encrypt validates domain ownership via ACME HTTP Challenge
- New Certificate created and obtained from Certbot
- Certbot Hook calls custom script
- Custom script uses OCI CLI to upload the new certificate to LB & update LB Listener to use the new certificate
Pre-Requisites
- Oracle Cloud Infrastructure Tenancy so you can access Always Free services
- Domain with DNS Entry (Can be obtained for free via NoIP)
Infrastructure Setup
Terraform
All of the terraform code is found here. Simply run this (don't forget to pass in your environment variables). This section is simply to give you an understanding of what we're doing via these terraform scripts.
 ShahvaizJanjua
Let's take a look at what the Terraform code will deploy.
Lets touch on 3 Components here;
- LoadBalancer Health Check:
The Loadbalancer sends traffic to the Certbot VM on port 80, however for the health check we use Port 22.
The reason for using Port 22 for the healthcheck is because the LoadBalancer will only pass traffic to the Compute instance if there is a service listening on the port and it gives a valid response, it performs this check at regular intervals. However the service that uses Port 80 is only started when the certbot is executed, it then immediately performs the ACME Challenge which will call Port 80. When the webservice starts, the LoadBalancer will get a valid response on its next health check, however the gap between starting webservice on port 80 and issueing the ACME challenge is too short for the LB to detect a valid backend and therefore the LB will not pass on the the ACME challenge to the backend/Compute instance. Port 22 (SSH) is always running and so the backend will always be healthy, ensuring the ACME Challenge traffic is passed to the Compute instance - Service Gateway:
This is required in order to use the Compute agent plugins, namely Bastion plugin, which will allow us to use the Bastion service - Bastion Service:
The LB Subnet is public, therefore accessible via Internet Gateway. However since the App Subnet is private, we'll be using the Bastion service in order to access the private VMs - Web Server:
This tutorial is about configuring Certbot, so we'll do the Web Server setup behind the scenes via terraform. We'll use cloud-init to setup the web server automatically upon the VM first starting so we don't have to spend time on this.
There's a few parts to performing the Infrastructure setup, the terraform scripts are relatively standard and simple, so we'll touch on some of the interesting parts, but this isn't a terraform tutorial so feel free to skip over this section!
Compute.tf
We'll use cloud-init to run a custom script on the Web Server to automatically configure our Web Service. All we want is a simple html page and a HTTP server running on port 8080 (instead of installing a HTTP server, we'll use the http.server python module to standup a basic python HTTP Service, purely for demo purposes). We can define the script by having the following data resource in terraform
data "template_file" "cloud-config" {
  template = <<YAML
#cloud-config
runcmd:
 - echo 'Starting Setup' >> /tmp/setup.log
 - sudo systemctl stop firewalld
 - mkdir -p /var/www/html
 - wget --output-document=/var/www/html/index.html https://github.com/ShahvaizJanjua/HOC_FREE_SSL_Demo/blob/main/index.html
 - cd /var/www/html
 - nohup python -m http.server 8080 &
YAML
}
To have this initialisation script executed, we base64-encode the data resource and assign it to user_data variable under the metadata block of WebServer oci_core_instance
  metadata = {
    ssh_authorized_keys = file(var.public_key_path)
    user_data = "${base64encode(data.template_file.cloud-config.rendered)}"
  }
Since our VMs are in a private subnet, we'll be using the free Bastion service to access the VMs. In order to do this, the Compute instances require to have the Bastion Plugin enabled, which we can do using the optional agent_config parameter
 agent_config {
        plugins_config {
            desired_state = "ENABLED"
            name = "Bastion"
        }
    }
Network.tf
We require to ensure we have the Service Gateway in our route table for the App Subnet, this is to allow us to enable the Bastion Plugin
resource "oci_core_route_table" "app_rt" {
    compartment_id = oci_identity_compartment.demo.id
    vcn_id = oci_core_vcn.lb_demo_vcn.id
    display_name = "APP_RT"
    route_rules {
        network_entity_id = oci_core_service_gateway.service_gateway.id
        destination = "all-fra-services-in-oracle-services-network"
        destination_type = "SERVICE_CIDR_BLOCK"
    }

    route_rules {
        network_entity_id = oci_core_nat_gateway.nat_gateway.id
        destination = "0.0.0.0/0"
        destination_type = "CIDR_BLOCK"
    }
}
NetworkSecurityGroups.tf
We want to allow incoming traffic to the LB on both ports 80 & 443. We can define both ports in a single resource block instead of having multiple. We do this by using for_each with a set of ports, which are then passed into the source_port_range block using each.key
resource "oci_core_network_security_group_security_rule" "lb_nsg_ingress" {
    network_security_group_id = oci_core_network_security_group.lb_nsg.id
    direction = "INGRESS"
    protocol = 6

    description = "Allow Public Access"
    source = "0.0.0.0/0"
    source_type = "CIDR_BLOCK"
    for_each = toset(["80","443"])

    tcp_options {
        source_port_range {
            max = each.key
            min = each.key
        }
    }
}
We want the LB to be able to communicate to the VMs on their respective ports. We use NSGs of each VM as the destination, which gives us flexibility and avoids hard-coding in IPs. We can use key value pairs in for_each in order to pass the port with its associated destination NSG.
resource "oci_core_network_security_group_security_rule" "lb_nsg_egress" {
    depends_on = [
      oci_core_network_security_group.crtbot_nsg,
      oci_core_network_security_group.websrvr_nsg
    ]
    network_security_group_id = oci_core_network_security_group.lb_nsg.id
    direction = "EGRESS"
    protocol = 6

         for_each = {"80" : oci_core_network_security_group.crtbot_nsg.id,
    "22" : oci_core_network_security_group.crtbot_nsg.id,
     "8080" : oci_core_network_security_group.websrvr_nsg.id}

    description = "Access VMs"
    destination = each.value
    destination_type = "NETWORK_SECURITY_GROUP"

    tcp_options {
        destination_port_range {
            max = each.key
            min = each.key
        }
    }
}
Bastion.tf
To create a Bastion session, we first require to provision a Bastion service and specify the target subnet & allows IP address range
resource "oci_bastion_bastion" "bastion" {
    bastion_type = "STANDARD"
    compartment_id = oci_identity_compartment.demo.id
    target_subnet_id = oci_core_subnet.vm_sub.id
    client_cidr_block_allow_list = ["0.0.0.0/0"]
}
In order to use the Bastion Service, we need to ensure that the Bastion Plugin is enabled on the Compute Instance. This takes a short time to instantiate and be detected as running, therefore we want a wait/sleep after provisioning the CertBotVM before we provision the Bastion Session, lets setup a wait/sleep resource that will wait for 5 minutes from when the CertBotVM instance is created.
resource "time_sleep" "wait_5_minutes_for_bastion_plugin" {
  depends_on = [oci_core_instance.CertBotVM]
  create_duration = "5m"
}
We then provision a new Bastion Session, it will depend on the wait resource and as such will wait for 5 minutes from CertBotVM creation before provisioning the Bastion Session.
resource "oci_bastion_session" "session" {
    bastion_id = oci_bastion_bastion.bastion.id

    key_details {
        public_key_content = file(var.public_key_path)
    }

    target_resource_details {
        session_type = "MANAGED_SSH"
        target_resource_id = oci_core_instance.CertBotVM.id
        target_resource_operating_system_user_name = "opc"
        target_resource_port = "22"
    }

    session_ttl_in_seconds = "10800"
    depends_on = [time_sleep.wait_5_minutes_for_bastion_plugin]
}
Installation & Configuration
Certbot, Automatic Renewal & OCI CLI
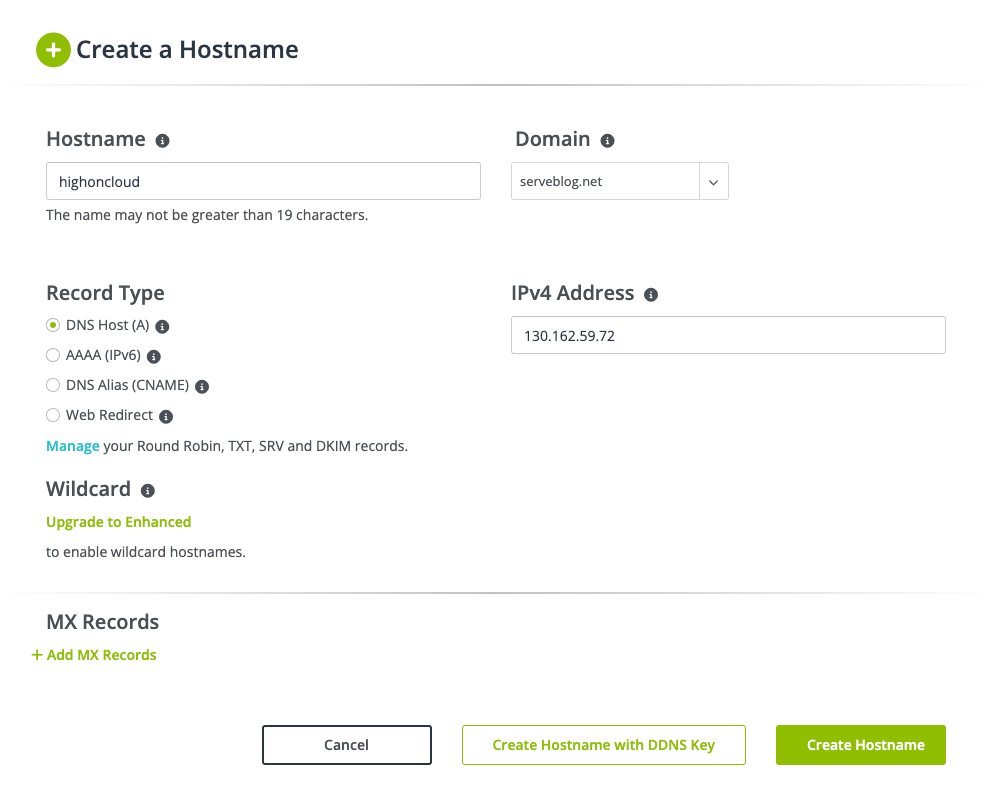
NoIP
We first grab a free domain from NoIP.com
Ensure you have added an A record to the DNS on NoIP to point your domain to the public IP of the Load Balancer
Install Certbot
When we run the terraform scripts, it will provide us with the SSH string to be able to connect to the certbot VM via bastion.
Now lets install Certbot
sudo dnf config-manager --enable ol8_developer_EPELEnable Developer EPEL in order to install snapd
sudo dnf install snapd -yInstall snapd
sudo setenforce 0
sudo systemctl stop firewalld
Disable selinux
sudo ln -s /var/lib/snapd/snap /snapCreate a symbolic link to /snap
sudo systemctl enable snapd
sudo systemctl start snapd
Start snapd
sudo snap install --classic certbotInstall certbot
sudo ln -s /snap/bin/certbot /usr/bin/certbotCreate a symbolic link to easily use certbot
Install OCI CLI
We'll be using OCI CLI to automatically deploy the new certificate once it is generated and every time it is renewed, so let's install OCI CLI.
sudo dnf install python36-oci-cli -yoci setup configRun this as opc and also run with sudo as well, or copy /home/opc/.oci/config to /root/.oci/
Automatic Renewal
Before we obtain our free certificate, lets setup our custom script to auto deploy the certificate to the Load Balancer. In older versions of certbot a cronjob would be required, however now certbot automatically schedules a (systemd) Timer to execute the certbot renew service. You can view this via sudo systemctl list-timers
There's 2 ways of having a script invoked via certbot renewal;
- Pass in --deploy-hook <script> when running certbot command.
A config file, named <DOMAIN>.conf will be created in /etc/letsencrypt/renewal. This config file will have an entry pointing to our custom script which will be executed whenever a renewal is run. - Place a script in /etc/letsencrypt/renewal-hooks/deploy
All scripts in here will be automatically executed when certbot executes a succesful certificate renewal
We'll go with option 1. Create a simple script like below
oci lb certificate create \
--load-balancer-id ocid1.loadbalancer.oc1.eu-frankfurt-1.aaaaaaaace2yjn77hmilofdqe5qcjqz5qomgoiekiymjuzjokvk5te6kxl2a \
--wait-for-state SUCCEEDED \
--certificate-name "$RENEWED_DOMAINS-"`date +"%Y-%m-%d"` \
--ca-certificate-file "$RENEWED_LINEAGE/fullchain.pem" \
--private-key-file "$RENEWED_LINEAGE/privkey.pem" \
--public-certificate-file "$RENEWED_LINEAGE/cert.pem"

oci lb listener update --force \
--load-balancer-id ocid1.loadbalancer.oc1.eu-frankfurt-1.aaaaaaaace2yjn77hmilofdqe5qcjqz5qomgoiekiymjuzjokvk5te6kxl2a \
--wait-for-state SUCCEEDED \
--listener-name "Web_Listener" \
--default-backend-set-name "WebBackendSet" \
--port 443 --protocol HTTP2 --cipher-suite-name oci-default-http2-ssl-cipher-suite-v1 \
--ssl-certificate-name "$RENEWED_DOMAINS-"`date +"%Y-%m-%d"`
lbcertupload.sh
Obtain Certificate & Automatically Deploy
Now we can generate the SSL certificates
[opc@crtbot ~]# sudo certbot certonly --standalone --deploy-hook /home/opc/lbcertupload.sh
Saving debug log to /var/log/letsencrypt/letsencrypt.log
Please enter the domain name(s) you would like on your certificate (comma and/or
space separated) (Enter 'c' to cancel): [lbdemo.ddns.net](http://lbdemo.ddns.net/)
Requesting a certificate for [lbdemo.ddns.net](http://lbdemo.ddns.net/)

Successfully received certificate.
Certificate is saved at: /etc/letsencrypt/live/lbdemo.ddns.net/fullchain.pem
Key is saved at:         /etc/letsencrypt/live/lbdemo.ddns.net/privkey.pem
This certificate expires on 2023-05-03.
These files will be updated when the certificate renews.
Certbot has set up a scheduled task to automatically renew this certificate in the background.

---

If you like Certbot, please consider supporting our work by:

- Donating to ISRG / Let's Encrypt: [https://letsencrypt.org/donate](https://letsencrypt.org/donate)
- Donating to EFF: [https://eff.org/donate-le](https://eff.org/donate-le)

---
This will retrieve the certificate and execute our custom script which will upload it to OCI and update the Listener to use the new certificate
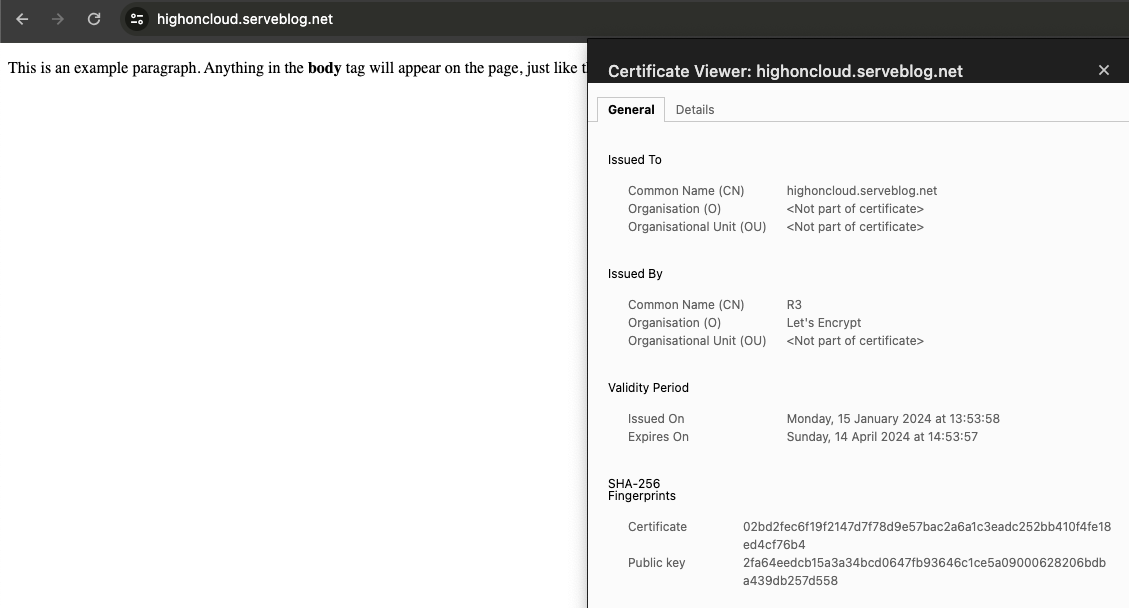
Lets go to our site and checkout the new certificate in action!