
Oracle Cloud DevOps: CI/CD is real!
A guide for implementing CI/CD Automation on Oracle Cloud DevOps

This blog serves as an example of implementing a Full end-to-end automation for deploying code to a "serverless" function, all hosted within OCI.
It's going to revolutionise the world and how we see technology henceforth... I think.
Background
You have a single or multiple routine jobs that you wish to automate through a script. You want this to be deployed on the cloud, with minimal input required on management of the platform as well as reducing costs. You also want to be able to rapidly develop, test and deploy this in a collaborative fashion.
Solution
What we need is a version controlled, collaborative and managed service that will scale, be maintained, only charge for actual usage and be easy enough to deploy and test.
OCI has the stack to solve all of these issues, you just don't know it yet.
Let's start with the design and work into the details of how we can fit them all together.
Workflow
I'm going to show what it would actually look like for Developers to use this system first, so you get a feel for it..
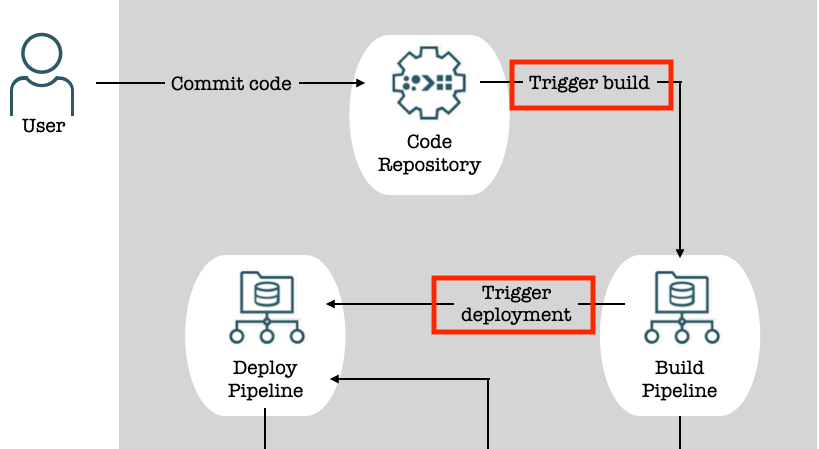
You, master of coding, write some nice code and commit it to the GIT repository (with a proper Commit message of course... I'm looking at my past self judgingly here)
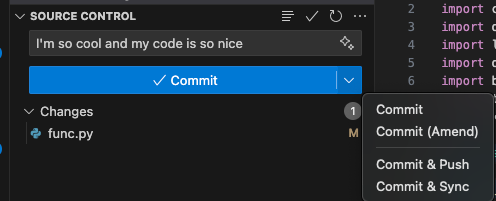
Once you hit that fateful Commit & Push button, the code, as you'd expect, is pushed to the repository. Aaaaaand, that's your work done.
What happens next... is magic (or just the CD part of CI/CD)
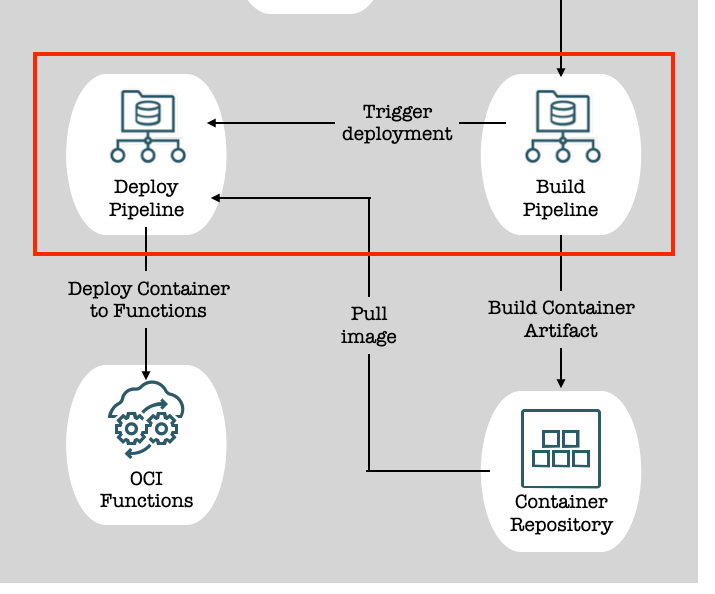
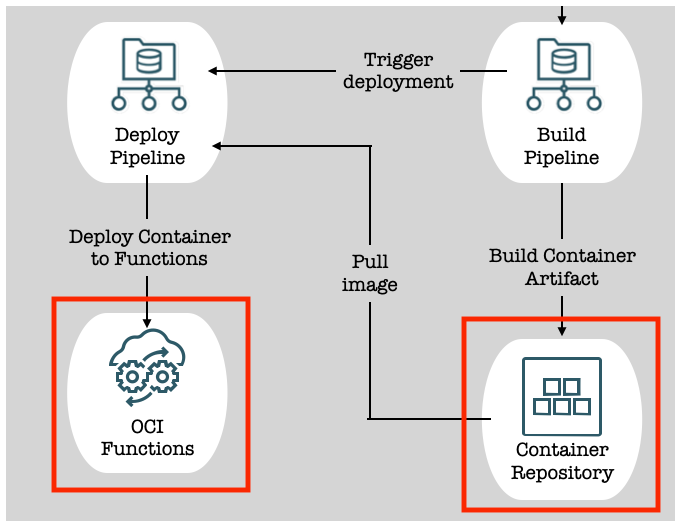
OCI DevOps will trigger a Build Pipeline, which triggers a Deploy Pipeline, which deploys to OCI Functions.
Let's dig into the details of how this works and, more importantly, how you can implement this today
Architecture
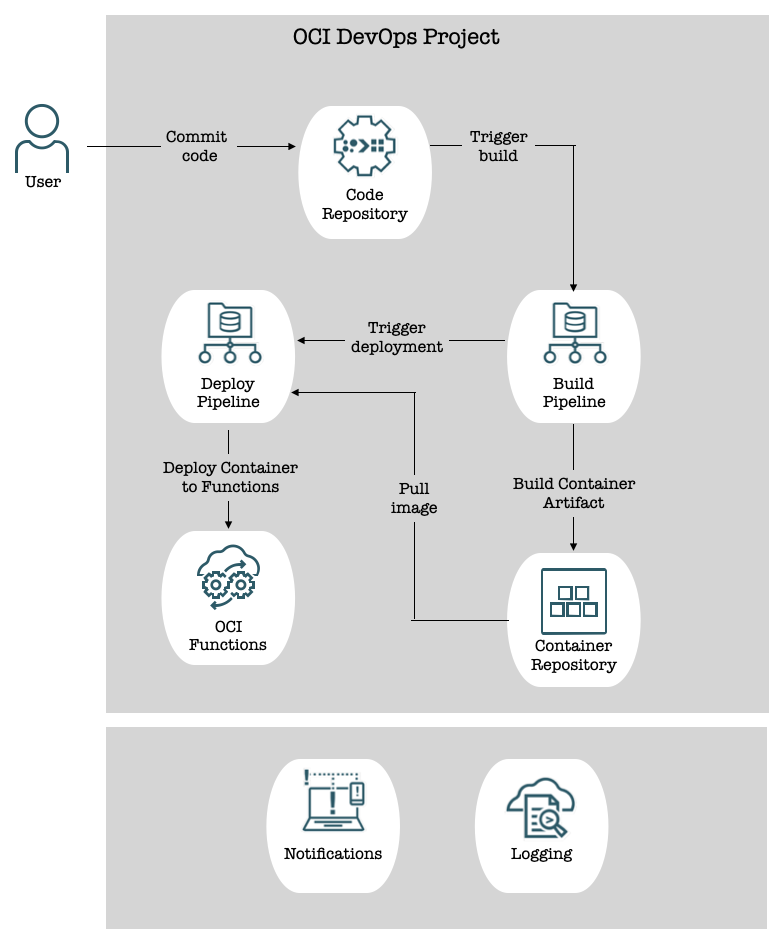
The involved components are:
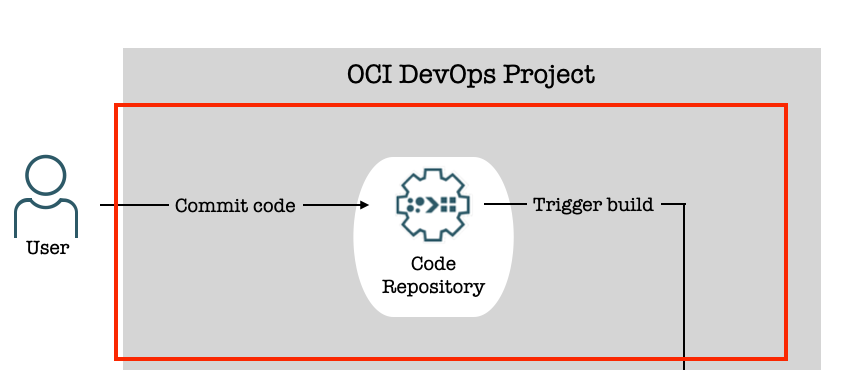
- OCI DevOps Project - An isolated logical environment hosting our CI/CD Resources
- Code Repository - GIT repository hosted and managed by OCI
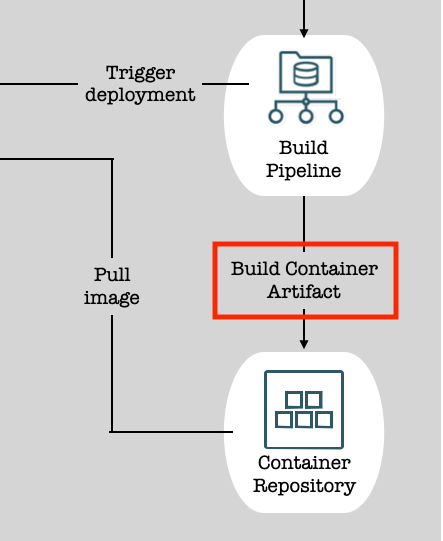
- Build Pipeline - Used to build (it's in the name) and test software artifacts
- Deployment Pipeline - Used to (you guessed it) deploy artifacts to target environment(s)
- Container Repository - Since we're deploying Docker Containers in this use case, our artifact repository is the OCI Container Repository
- OCI Functions - The target environment to which the Deploy Pipeline will, you know, deploy artifacts.
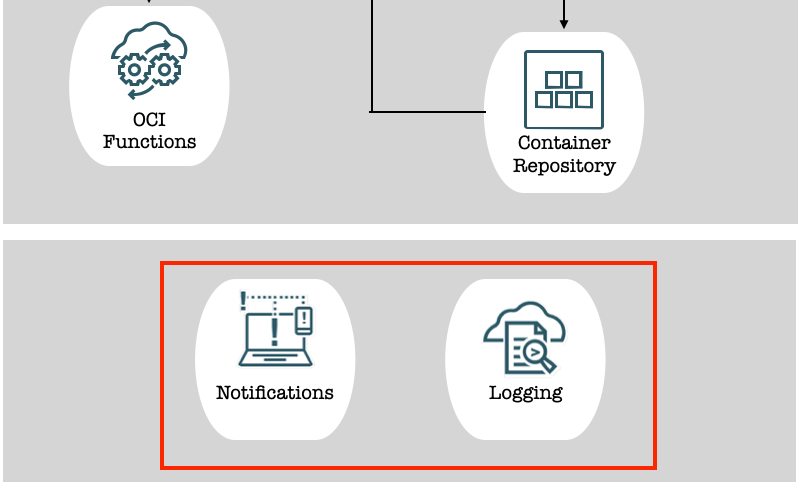
- OCI Logging/Notification - Useful for (surprise surprise) logging and alerting of any happenings within the Project
Breakdown
Now let's go into each of the above components and discuss how they fit into our specific use-case
OCI Logging/Notifications
When creating a DevOps Project, OCI needs a place to send all of the related alerts and logs (think Pipeline runs and failures, triggers, merges etc). For this, we'll create an OCI ONS Notification Topic and associate this at Project creation, allowing all the relevant notifications to be sent here.
DevOps Project
This one is pretty simple. An OCI DevOps Project is a logical grouping of all the resources required to implement a CI/CD workflow. All the components we go through henceforth will sit under a single Project umbrella.
The nice thing about having everything hosted within OCI is that you no longer have to manage Identities and Access Control across multiple platforms (or try and integrate different platforms with a central LDAP provider). Everything is in one place with OCI's (quite decent if I do say so myself) Policies for granular access control.
Code Repository
A requirement for the CI part of any CI/CD workflow is a version-control system (usually GIT unless you just love being different).
OCI hosts GIT repositories as PaaS services. This is cool because <insert-usual-PaaS-benefits-here>. As a user, you simply create a repository, and off you go.
Code Repositories retains all of the usual GIT features: commits, pulls, pushes, merge requests etc and make up the first step in our journey to deployment.
Pipelines
A ubiquitous term in DevOps. OCI comes with two types of Pipelines allowing you to separate the stages of deployment.
- Build Pipeline: Used to compile, test and (key is in the name) build artifact(s). Think of creating a Spring Boot jar file with
java -jaror using a Dockerfile to create an image. - Deploy Pipeline: Deploy your artifact to the target environment(s).
Build Pipelines have a "Managed Build" stage which takes in a build_spec.yaml file with instructions on how to build the required artifact(s). You can (should) also use this stage to perform tests, however testing isn't covered as part of this guide (see disclaimer).
Deploy Pipelines require two things:
- Artifact(s): These should already be compiled and stored in an Artifact Repository. In our case, this will be the container image created from our code in the Build Pipeline.
- Environment: The target platform for your software. We'll be deploying directly to our OCI Function.
Trigger
OCI Triggers are used in the same way as any GIT trigger. We'll be waiting for pushes to the main branch (see disclaimer before you send death threats) in our Code Repository and using that to trigger the build Pipeline run.
We'll be using another trigger (but defining this one in the Build Pipeline) to kick off the Deployment Pipeline once the Build Pipeline has completed it's steps.
build_spec.yaml
This is the yaml file stored in the Code Repository which tells the OCI Build Pipeline how to work. You can define any number of steps and stages within this (compile, test, rollback on failures etc.).
By default, the Build Pipeline will attempt to find this in the root of your supplied Code Repository, if it is not named as expected or can be found somewhere else, you'll need to configure the Build Pipeline with this location.
In our case, we'll be using this file, along with a Dockerfile to build our python code into a container image,
Implementation
Now that we understand all of the individual pieces of the puzzle, let's get them all working together.
A word of warning, the next steps are quite in-depth with some moving parts.
Pre-requisites
You'll need an existing OCI Function to deploy to. If you don't have a function, create one using the QuickStart Guides:
You'll also need an OCI IAM User with the appropriate policies allowing it to Manage (push) OCI Container Repository images. Create an Auth token for this User and store it as a Secret in an OCI Vault in the same compartment as your DevOps project. You'll throw this Secret OCID into your build_spec.yaml file.
Step-by-step
Up to this point, what we have is all of the Building blocks for a streamlined, automated deployment. Let's get to deploying
Terraform
Before deploying, ensure you have appropriately populated the provided variables.tf file. The required variables should be self-explanatory (if not, write a pipeline that, when triggered - like you - will send me a strongly worded email)
The code example assumes an OCI Function already exists and we're referring to its OCID which is stored in a terraform variable.
The code will also create all of the required Policies and the dynamic group to give OCI DevOps the required permissions in the compartment.
Run the provided terraform code to spin up all the resources
 usamahuzi
- Dynamic group and associated Policies for OCI DevOps:
- Allow DevOps resources to manage all resources within the compartment
- DevOps Project with ONS Notification Topic
- Code Repository and Trigger
- Target Deploy Environment and Deployment Artifact
- Build and Deploy Pipelines with Stages
Code Repository contents
Once we have the platform, we'll need to setup the contents of the Code Repository that will allow our OCI Function to be deployed and tested.
Fn project CLI
For this, you'll need the Fn project CLI installed:
- For Windows:
curl -LSs https://raw.githubusercontent.com/fnproject/cli/master/install | sh- For Mac:
brew update && brew install fnConfirm installation using:
fn versionwhich should output something similar to the below (I'm not using the latest version, terrible)
Client version: 0.6.36 is not latest: 0.6.39Generic Function code
Next you'll need to clone your Code Repository locally following this guide:

Once cloned, move into your repository directory
cd repository-nameInitialise the function using:
fn init --runtime [go|java|node|python] my-funcSince this guide is creating a python function, I did:
fn init --runtime python user-report-fnThis will create a new directory with your function name. I'll be referring to my function name as user-report-fn from now on. Make sure to use the name you've given your function.
To keep things simple, we'll move everything to the root of the Code Repository and delete the new folder:
mv  user-report-fn/* ./
rmdir user-report-fn
Your directory should contain the following files for a python function:
func.py
func.yaml
requirements.txt
func.py - Your function code to be executed (put everything under the handler function)
func.yaml - Metadata about your function such as name, version
requirements.txt - A list of dependencies required for your python function to operate
You can find sample functions on the OCI GitHub which will give you an idea on how to get started. This guide won't cover Function development.
oracle-samplesSpecific Code for this automation
Once you have your function ready for deployment, you'll need to add 2 more files to the root of the Code Repository.
build_spec.yaml- As mentioned previously, this gives the instructions to the Build PipelineDockerfile- This is required to create the Container Image that will ultimately be deployed as the OCI Function
Example contents of these files can be found here:
usamahuziDo you care about what's going on in the build_spec.yaml file? If so, you need a hobby, but take a gander at the section below
build_spec.yaml
This file is quite important to making this all work so let's go through it. Any reference looking like ${this} are for Build Pipeline Parameters which we have defined in our terraform and should already exist as part of the terraform deployment.
There is a single step which will run on the OCI Build Runner (a bash shell environment) and execute our command which is running docker build to create the Container Image locally.
This will finish by passing the location of the Image, as an outputArtifact, to the next stage which is the Deploy Pipeline
Your Dockerfile can be identical to the one provided if you're using Python so easy peasy there.
Phew. I think we're ready to get this show on the road!
Push to the Code Repository and sit back to watch the magic happen.
Validation
Log into the OCI Console and you should be able to see your DevOps Project containing a new Code Repository, Build Pipeline, Deploy Pipeline, Trigger, Environment and Artifact.
Any new pushes of code to the Code Repository will kick off your Pipeline process, resulting in a shiny new Function being deployed, ready to wreak havoc on your enemies... or similar.
Conclusion
Wow. You've reached the end. Please get some sunlight.
Here's a nice meme summing up my experience getting the tech for this blog working.