
Creating a Free (HTTPS) Blog on Oracle Cloud
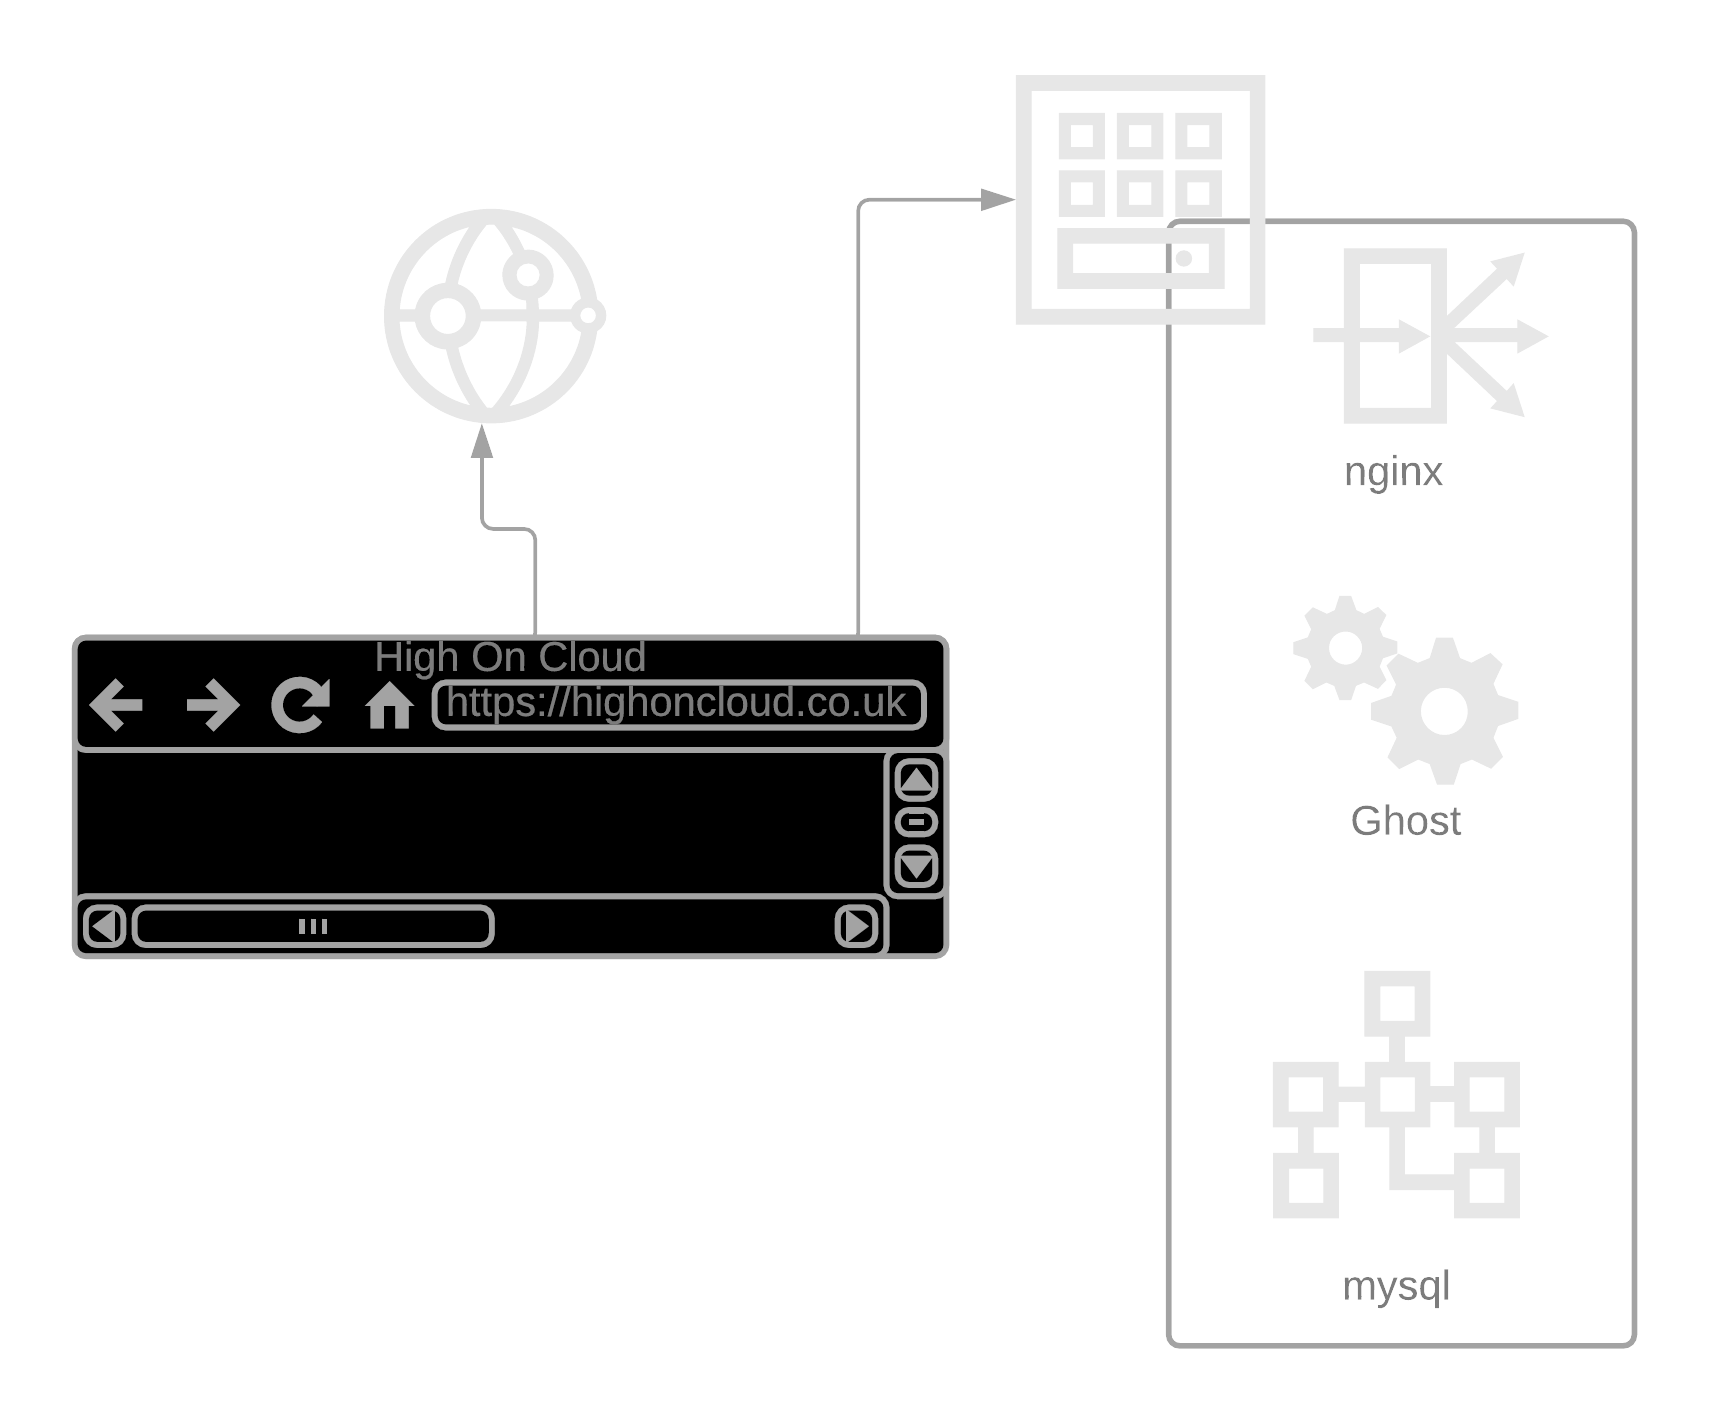
In this article we'll walkthrough the steps to create a free website or blog hosted on Oracle Cloud Infrastructure (FYI, at the time of writing this article this site is hosted on OCI using these very steps). We'll first have a very short introduction into the various components involved in this setup, then look at the process and start getting to work! Feel free to skip the theory and jump to whatever section you're interested in.
Components:
Oracle Cloud Infrastructure
Oracle Cloud Free Tier offers Always Free services, which includes a Compute VM which we'll use to host our free website
Ghost
Ghost is a free, opensource and simple web application from which you can create and manage your blog and contents. It has the combined advantage of automatically configuring nginx as a reverse proxy and for HTTPS, as well as obtaining the SSL Certificate and making a crontab entry to automatically renew these certificates.
Let's Encrypt
Let's Encrypt is a free, opensource and automated Certificate Authority. Let's Encrypt offer FREE SSL/TLS Certificates! They are only valid for 90 days, but can simply be renewed.
NoIP
NoIP offer free hostnames under select few domains, they also provide you with complete control over the DNS records for that hostname, so we can the website address directly to our Free OCI VM
Process
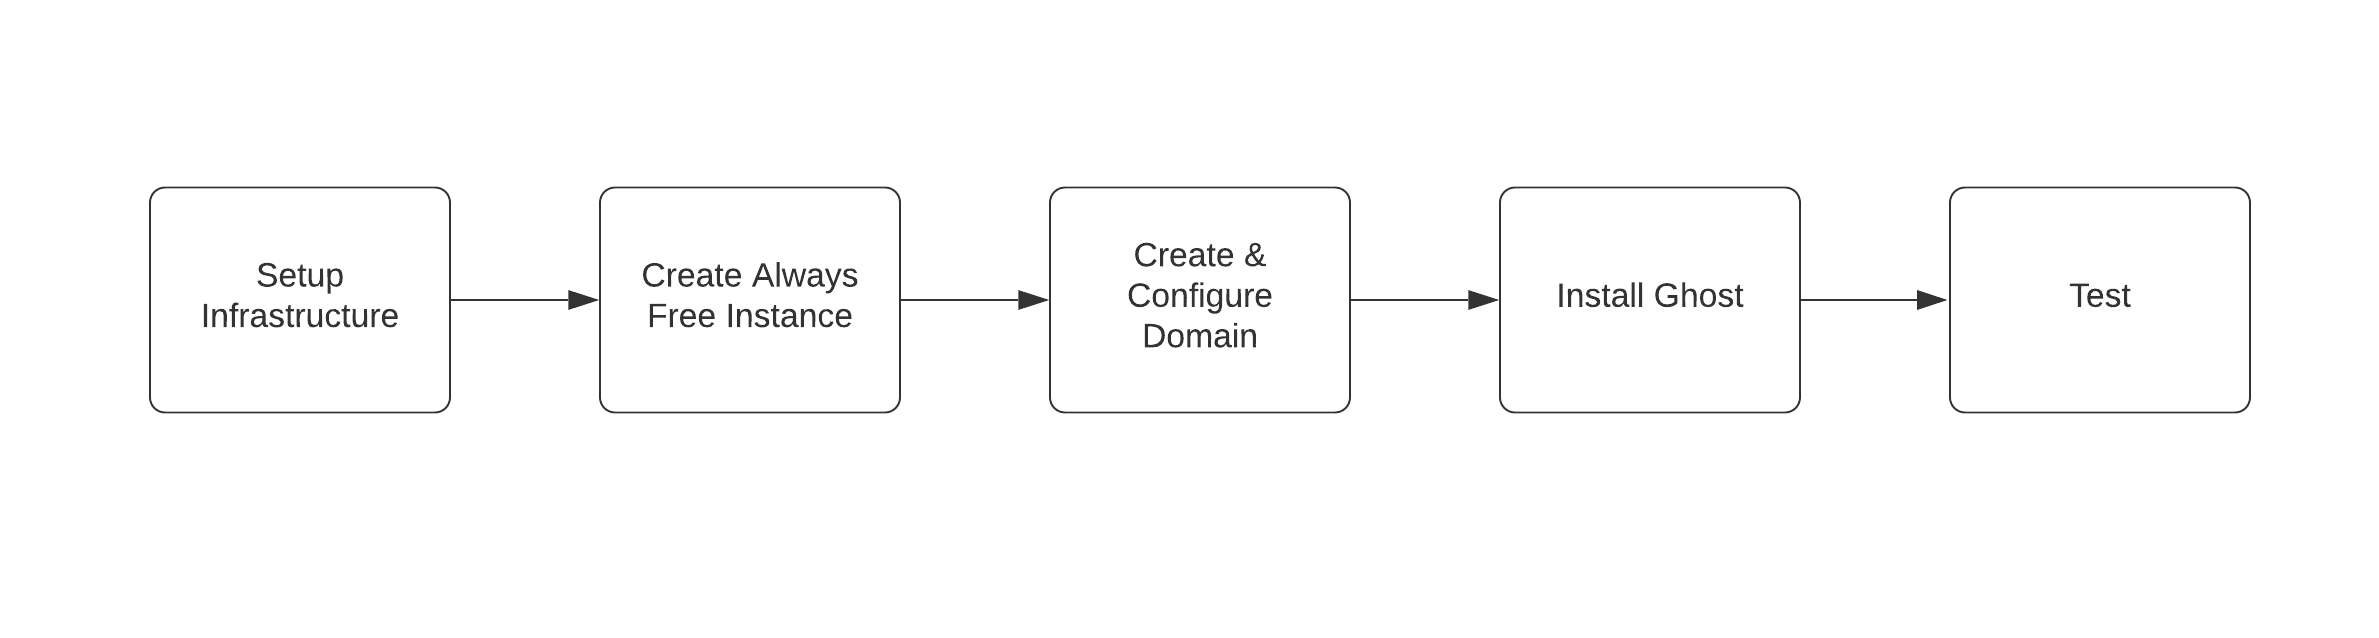
The process itself is quite straight forward. First we'll setup the underlying infrastructure in OCI to support the provisioning of our Free VM. We'll then Create and Configure the domain and DNS and point it to our OCI VM (This must be done before configuring Ghost in order to obtain and configure SSL Certs). We'll then finish up by installing Ghost! Here we go!
Tutorial
If you don't already have an OCI tenancy then go and grab your Always Free account...
Create an Always Free Instance
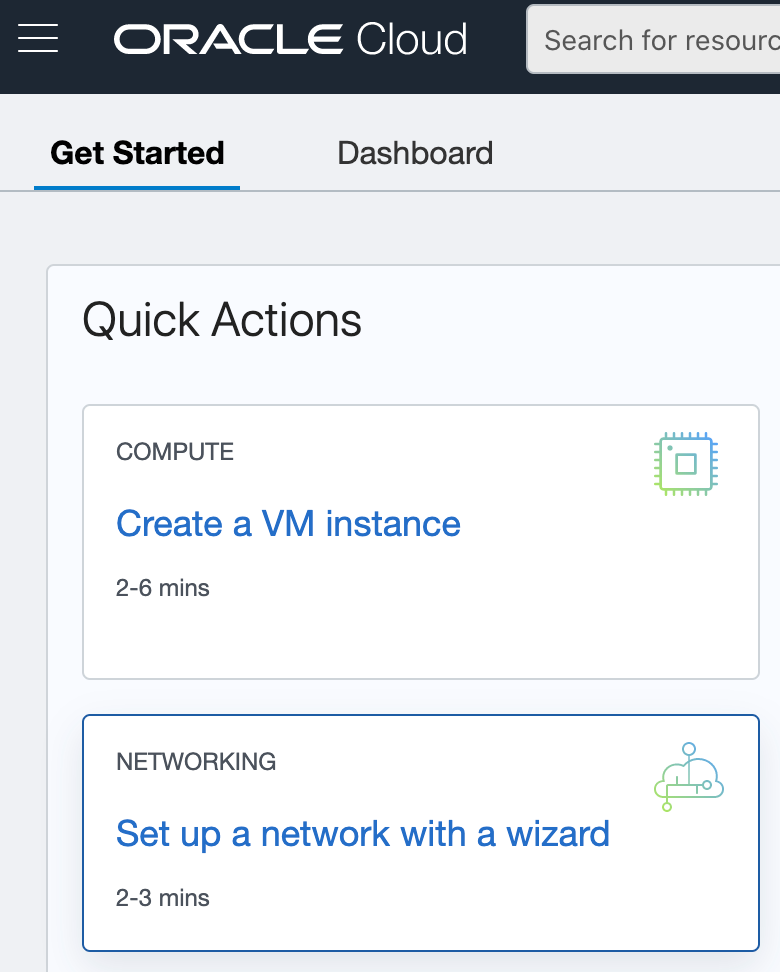 Once you've logged in, select "Create a VM"
This process will create the underlying network as well as creating the VM
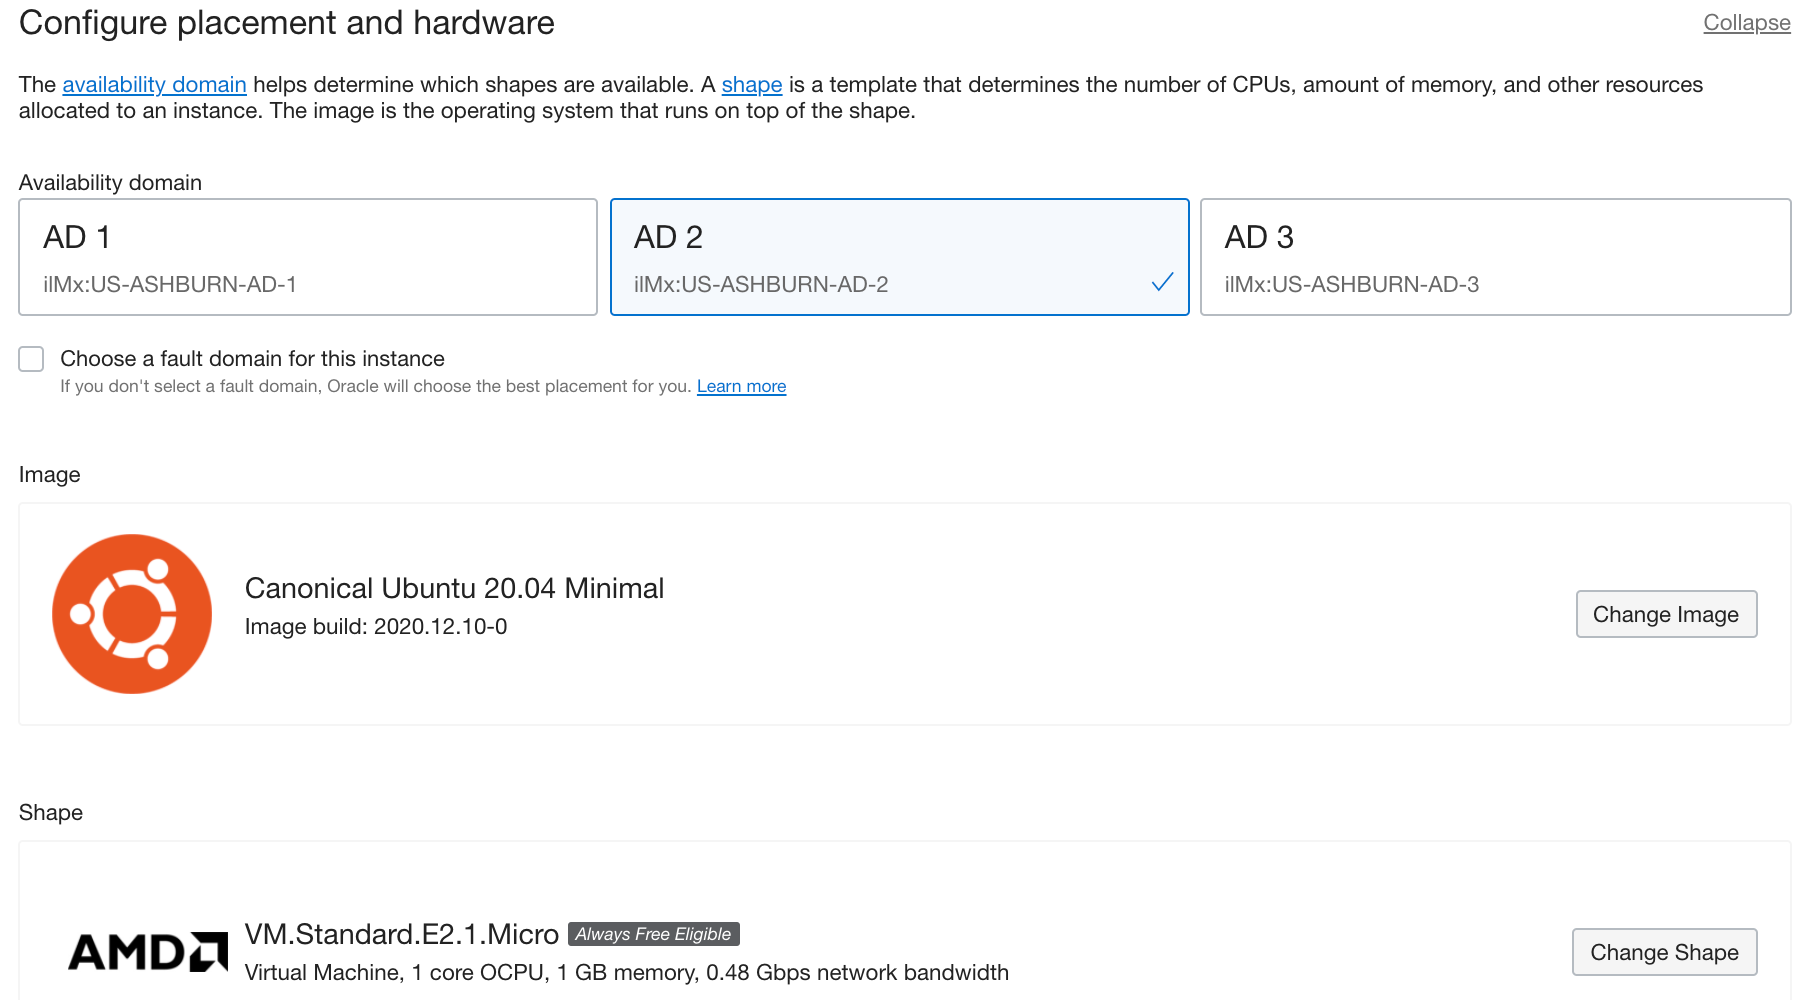 Select the "Always Free Eligable" Shape
Select "Canonical Ubuntu 20.04 Minimal" Image
Minimal image is smaller, faster to boot and lightweight
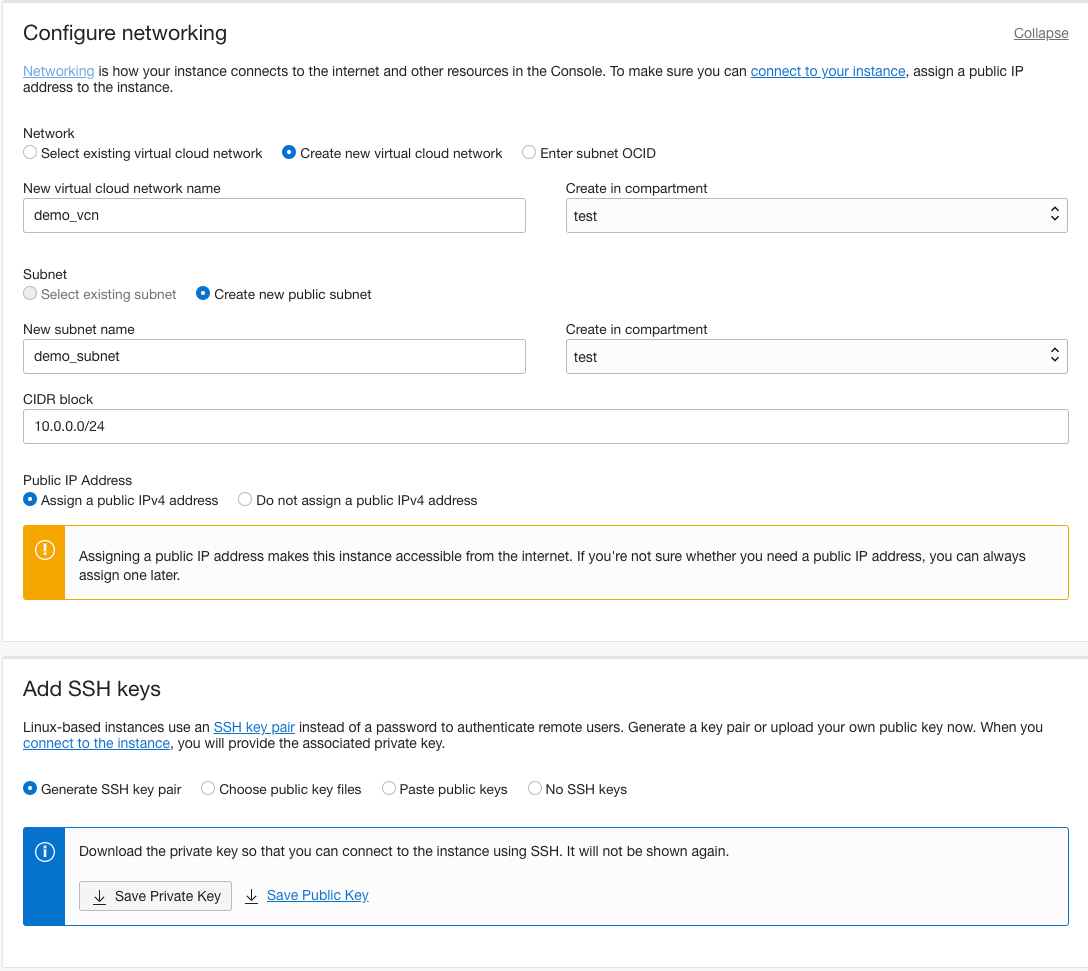 Scroll Down
Change the VCN & Subnet name to something meaningful
Save the Private Key so you can SSH into the VM
Click Create
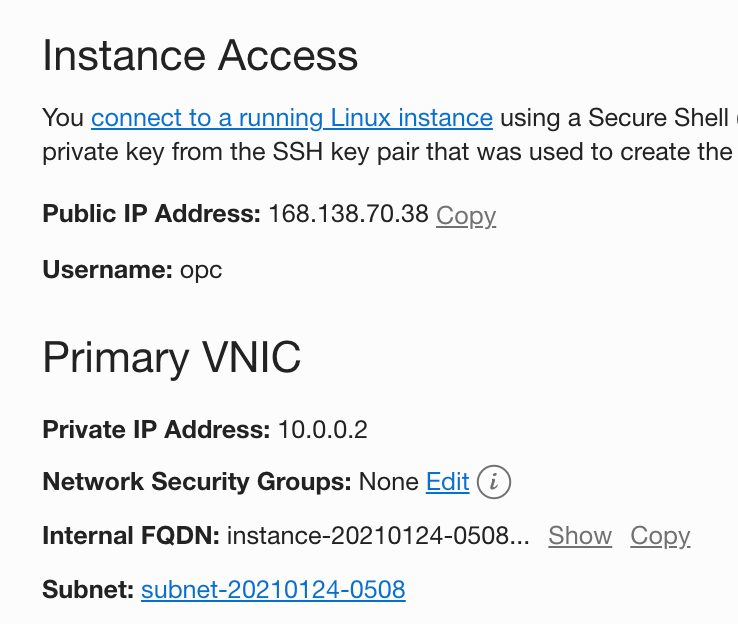 You'll be taken to the Instance Information page
Make a note of the Public IP
Click on the Subnet
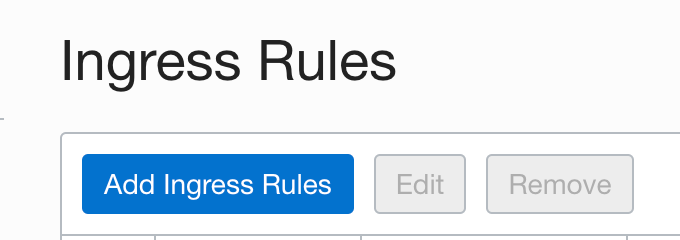 You'll be taken to the Security List for your subnet
Click on the Default Security List
You'll be taken to the Firewall Rules Rules
Click Add Ingress Rules
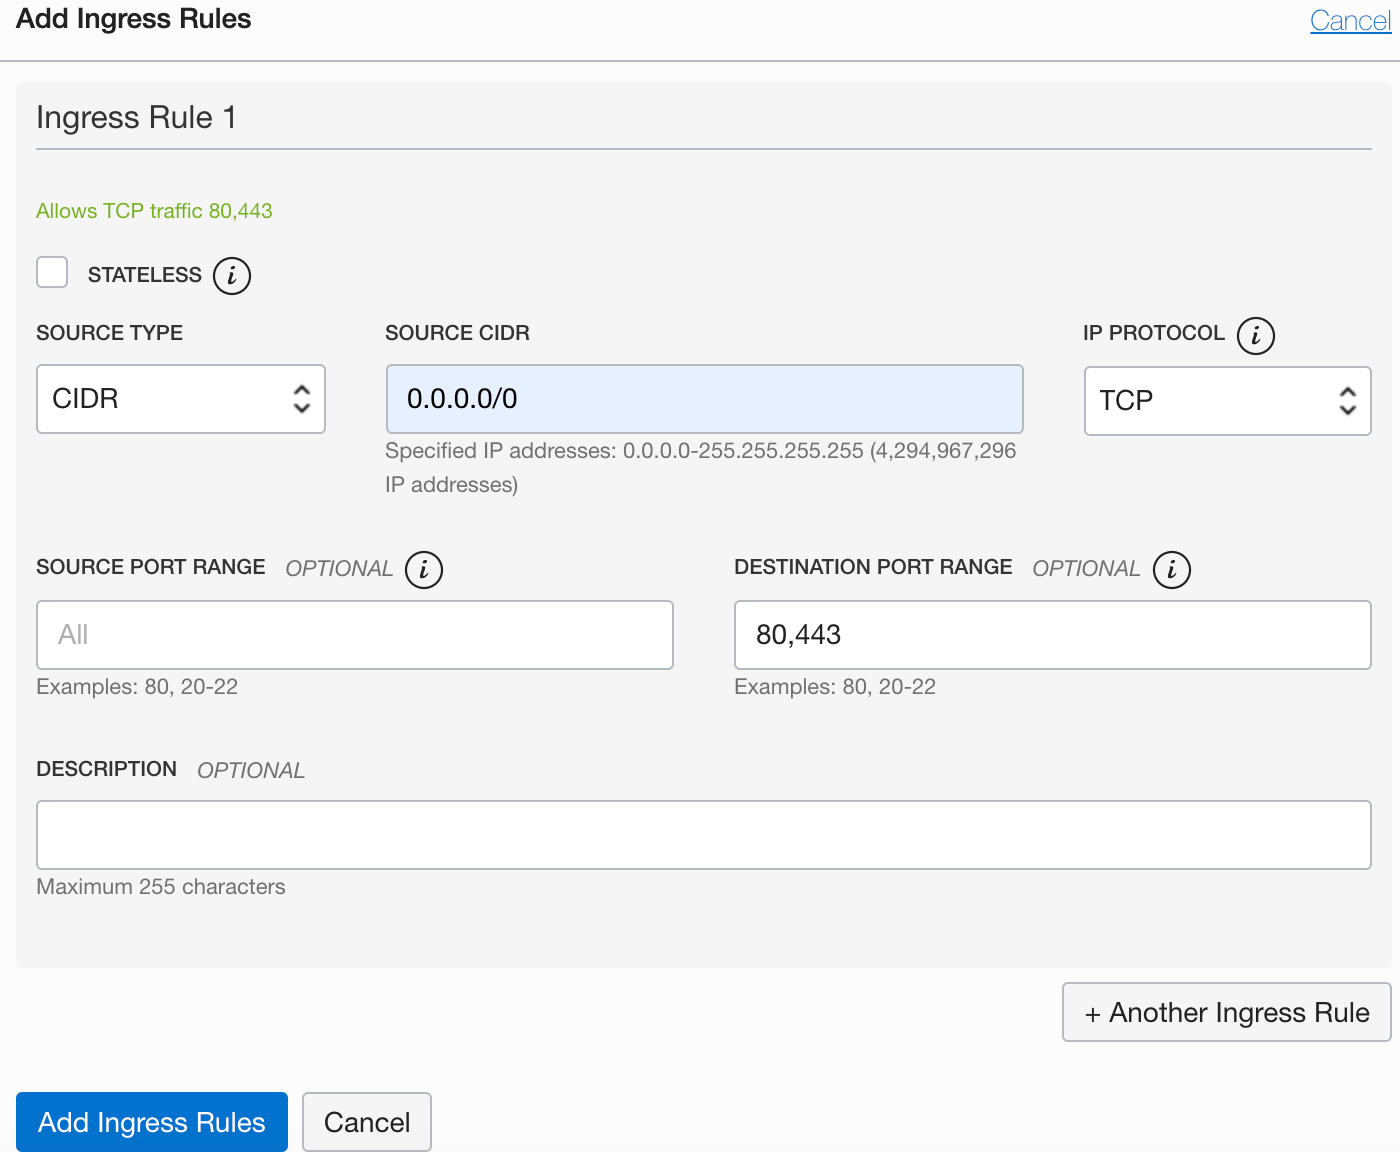 Set the Source CIDR as 0.0.0.0/0
Set the Destination Port Range as 80,443
80 is required for SSL Cert setup,
443 is for HTTPS traffic to your site
Create & Configure Domain
 Head over to https://www.noip.com/ and grab your free domain
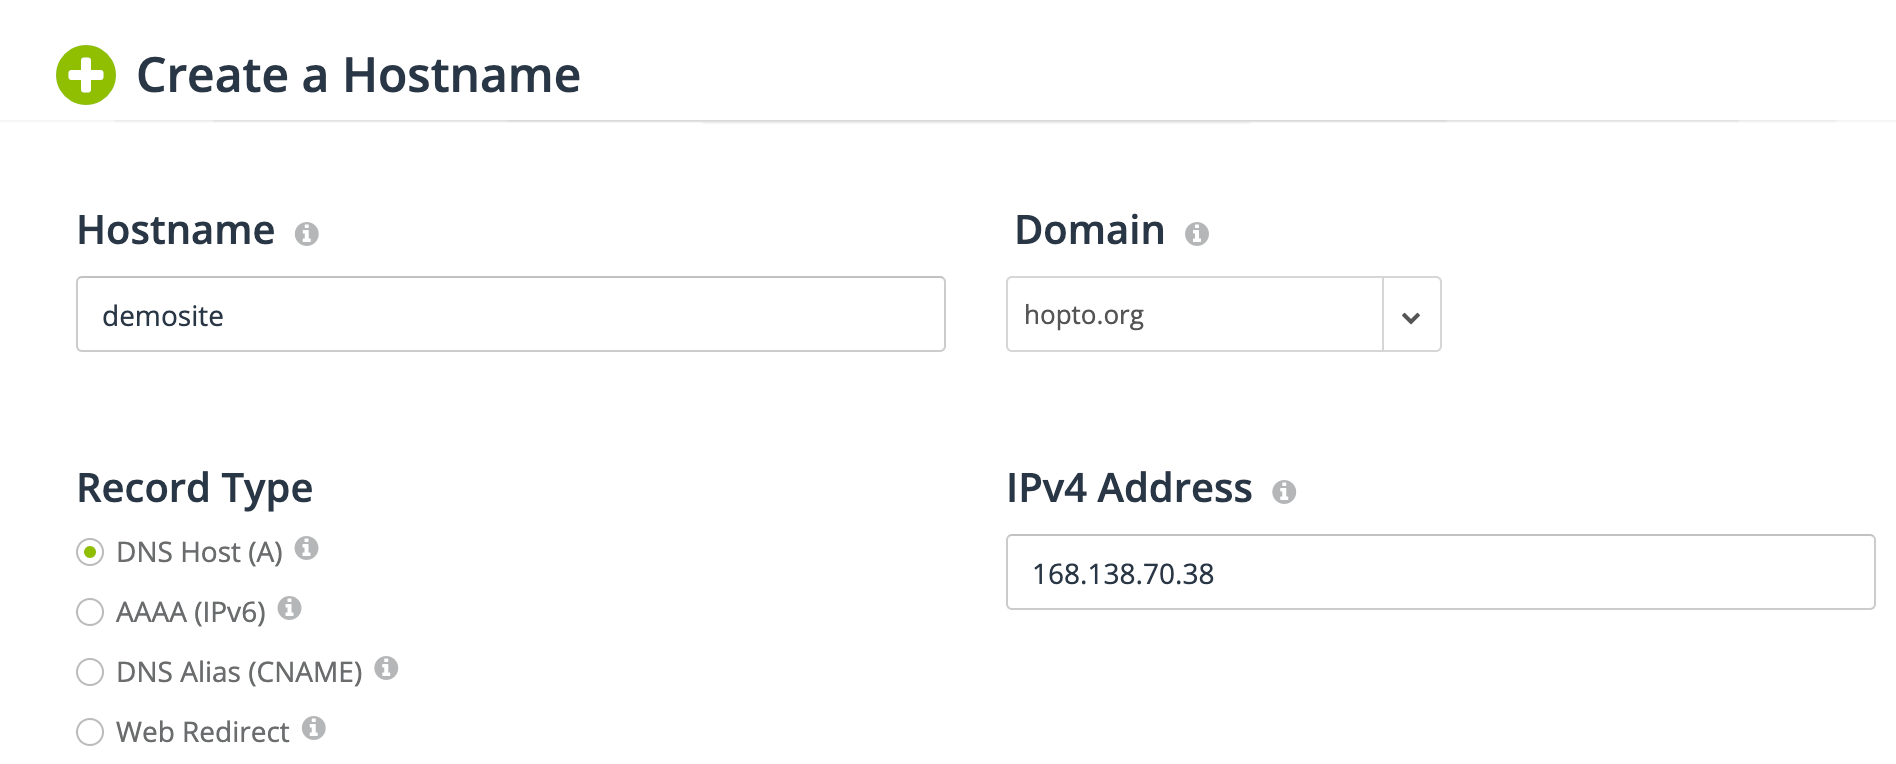 Create an A record in the DNS
Use the IP of your Free VM
Install Ghost
SSH into your Free VM as the ubuntu user using the Public IP & Private Key you downloaded during VM Creation
Now let's start with the Ghost setup installation.
sudo apt upgrade
sudo apt update
Perform an update of the packages
sudo iptables -I INPUT 5 -p tcp --dport 80 -j ACCEPT
sudo iptables -I INPUT 5 -p tcp --dport 443 -j ACCEPT
sudo iptables-save | sudo tee /etc/iptables/rules.v4
Open up the OS Firewall for ports 80 and 443
sudo adduser ghostusr
sudo usermod -aG sudo ghostusr
sudo su - ghostusr
Create a user for Ghost install, allow the user access to sudo
sudo apt install cron
sudo apt-get install nginx
sudo apt-get install mysql-server
Since this is Ubuntu Minimal it may not have cron package by default, so install cron as well as nginx and mysql
sudo mysqlLogin to mysql
alter user 'root'@'localhost' identified with mysql_native_password by 'oracle99';
quit;
Set the root user password
curl -sL https://deb.nodesource.com/setup_12.x | sudo -E bash
sudo apt-get install -y nodejs
Install nodejs
sudo npm install ghost-cli@latest -gInstall Ghost CLI
sudo mkdir -p /var/www/ghost
sudo chown ghostusr:ghostusr /var/www/ghost
sudo chmod 775 /var/www/ghost
cd /var/www/ghost
Create a directory to host the Ghost Instance
Run the Ghost installation. You'll need to provide the URL, mysql details and an email address.
Answer Yes to all responses
ghost install
✔ Checking system Node.js version
✔ Checking logged in user
✔ Checking current folder permissions
✔ Checking system compatibility
✔ Checking for a MySQL installation
✔ Checking memory availability
✔ Checking free space
✔ Checking for latest Ghost version
✔ Setting up install directory
✔ Downloading and installing Ghost v3.40.5
✔ Finishing install process
? Enter your blog URL: https://highoncloud.co.uk
? Enter your MySQL hostname: localhost
? Enter your MySQL username: root
? Enter your MySQL password: [hidden]
? Enter your Ghost database name: ghostdb
✔ Configuring Ghost
✔ Setting up instance
sudo chown -R ghost:ghost /var/www/ghost/content
	✔ Setting up "ghost" system user
	? Do you wish to set up "ghost" mysql user
	? Yes
	✔ Setting up "ghost" mysql user ? Do you wish to set up Nginx
	? Yes
sudo mv /tmp/highoncloud-co-uk/highoncloud.co.uk.conf /etc/nginx/sites-available/highoncloud.co.uk.conf
sudo ln -sf /etc/nginx/sites-available/highoncloud.co.uk.conf /etc/nginx/sites-enabled/highoncloud.co.uk.conf
sudo nginx -s reload
	✔ Setting up Nginx
	? Do you wish to set up SSL? Yes
	? Enter your email (For SSL Certificate) user@highoncloud.co.uk
sudo mkdir -p /etc/letsencrypt
sudo ./acme.sh --install --home /etc/letsencrypt
sudo /etc/letsencrypt/acme.sh --issue --home /etc/letsencrypt --domain highoncloud.co.uk --webroot /var/www/ghost/system/nginx-root --reloadcmd "nginx -s reload" --accountemail shahvaiz.janjua@hotmail.co.uk
sudo openssl dhparam -dsaparam -out /etc/nginx/snippets/dhparam.pem 2048
sudo mv /tmp/ssl-params.conf /etc/nginx/snippets/ssl-params.conf
sudo mv /tmp/highoncloud-co-uk/highoncloud.co.uk-ssl.conf /etc/nginx/sites-available/highoncloud.co.uk-ssl.conf
sudo ln -sf /etc/nginx/sites-available/highoncloud.co.uk-ssl.conf /etc/nginx/sites-enabled/highoncloud.co.uk-ssl.conf
sudo nginx -s reload
	✔ Setting up SSL
	? Do you wish to set up Systemd? Yes
sudo mv /tmp/highoncloud-co-uk/ghost_highoncloud-co-uk.service /lib/systemd/system/ghost_highoncloud-co-uk.service
sudo systemctl daemon-reload
	✔ Setting up Systemd
sudo systemctl is-active ghost_highoncloud-co-uk
	? Do you want to start Ghost? Yes
sudo systemctl start ghost_highoncloud-co-uk
sudo systemctl is-enabled ghost_highoncloud-co-uk
sudo systemctl enable ghost_highoncloud-co-uk --quiet ✔ Starting Ghost
Ghost uses direct mail by default. To set up an alternative email method read our docs at https://ghost.org/docs/concepts/config/#mail

Ghost was installed successfully! To complete setup of your publication, visit:
<https://highoncloud.co.uk/ghost/>